
Get our FREE Project Planning Guide
"*" indicates required fields
In this specific tutorial, we’re going to be laying a walkway with a lot of curves and runs downhill, which means it’s a bit complex. But don’t be intimidated! If you can grasp the basic principles in this tutorial, you’ll be able to lay any curved paver walkway.
Step 1: Prepare your base
The first thing you’ll have to do is prepare your base. This step includes tasks like establishing a layout, setting grade, and excavating dirt and debris.

In this project, we had to remove a failing paving stone walkway that was initially laid on top of a stump. As you can imagine, this created sinkholes that made it no longer safe for heavy pedestrian traffic. So we removed the pavers, removed the roots and the stump, and cleared a path for new pavers.
To prepare your base, you’ll want to do the same things, including excavate 7–13” of dirt and fill with ¾-0 road base. You’ll then need to compact the gravel and ensure it’s as level as possible.

Pro Tip: If the pavers are only for pedestrian traffic, dig 7” below finished grade. If the project is receiving vehicular traffic, excavate 9–13”.
We’re not going to discuss base preparation in-depth in this tutorial, but you can look at our tutorial on How to Prep & Lay a Paver Base for step-by-step guidance.
Step 2: Screed the sand bed
Once you’ve prepared your gravel base, you can screed the sand bed. In short, you’ll want to spread moist washed concrete sand in a 1” uniform layer across your entire project.

To do this, we used 1” outside diameter square metal tubing. To make it a little bit easier, we started at the top of the project and worked our way downhill.
Because we had a few different transitions in grade, laying rails with each change will make screeding a lot easier and more efficient. Additionally, this will help you split whatever differences we can to make this look as gradual as possible.

Double-check your rails at any absolutes, like asphalt or concrete. The best way to do this is to slide a paver up there and beat your rail down slightly. Any discrepancy within an eighth or a quarter of an inch is tolerable.
When working with long screed rails and natural grade, you’ll occasionally have some humps and bumps. So, if your rail bows, that’s fine. Just make sure you apply force with your screed board and work with those transitions instead of against them. Use a screed board to spread the sand evenly wherever you’ll lay a paving stone.

Lastly, fill any voids left in the sand from footprints or metal tubing by hand. Just toss in some fresh sand with a shovel and smooth it out with a trowel.
Step 3: Lay your paving stones
Your next step is to lay paving stones. For this specific project, we laid a Herringbone pattern. However, you can choose the right pattern for your project.
For curved walkways or patios, it’s easiest to lay a Running Bond pattern to run your stones along with the curve. You’ll avoid a lot of cuts that way. However, since we laid a different pattern—and you might want to do the same thing as well—we’re going to cut all the edges into our curves. We’ll get into this in more detail later.

The best place to start is in a square corner. If your project already has a square corner at a foundation or concrete corner, you can just lay off that. If it doesn’t, you’ll have to make a square corner to work from. Just follow our instructions in How to Square a Corner Using the 3-4-5 Method, and you’ll be set.
Always lay each paver using the click-and-drop method. This method will ensure that you don’t bulldoze your sand bed and create bumps or sinkholes in your final product.

When you’re dealing with a steep grade, like in this project, we always recommend that you lay uphill. However, we chose to lay downhill because we wanted to avoid making any cuts at the top of our project. If you’re going to do a similar thing, that’s fine. Just make sure that you tap your stones upward as you lay them, so they stay straight and don’t shift downhill.

Lastly, use a paver adjuster (a screwdriver or putty knife would work fine as well) to ensure your pavers are as square and straight as possible. If you cut your border now and then adjust your lines later, some of your cuts may look wrong. This task may feel like wasted time, but it’s a pivotal part of the project.

Step 4: Mark and cut your curve
Once you’ve finished laying your field, you’ll need to mark and cut your curve. Lay down a half-inch PVC conduit along where you want to cut your curve and draw a line on your pavers using a paver marker.

PVC conduit like this works great because you can connect multiple lengths if your walkway is long. It’s much easier if you have numerous people to help with this task. If you have to mark a long curve yourself, the easiest way to do that is to hold down portions of the pipe with extra stones, about every four feet, and then make the marks.

Mark both sides of your curve using this method. For this project, we wanted to start with 72 inches at the bottom of the curve. Then, we want to neck it down to about 48 inches in the middle. To accomplish this, we took a tape measure and made multiple marks from one end to the other. We’ll then use those marks as a guide for our pipe to make sure that we’re entirely the same width throughout the curve.
Before we make cuts on each paver along the mark, we’re going to use a demo saw to score these lines. We do this because a wet tile saw will wash off the cut mark we made. A light score will ensure we don’t have to mark anything twice.

Once we scored our curve, we used a masonry saw to cut each stone. Read or watch our tutorial 6 Ways to Cut a Paving Stone for more information on how to cut a paver.

Step 5: Place border stones
Once you’ve finished cutting your field, you can start laying your border stones. If your curves are pretty gradual, you can just lay the border stone along your curve with slight gaps.

Wherever the radius gets a little bit tighter or too spacious, you might need to cut your stones and give them a little bit of a bevel, so your gaps aren’t too large.
You’re going to install edge-restraint in the next step to reinforce your border stones. Once you fill all your gaps with sand, slight errors won’t be visible.
Reference our tutorial on how to design a paving stone border for learning about different border patterns and methods of laying.
Step 6: Install edge restraint
To secure your field stones and your border, you’ll need to install edge restraint. You can use concrete or plastic edge restraint. Still, we recommend using plastic edge restraint as it’s the most flexible solution, especially for a curved walkway.
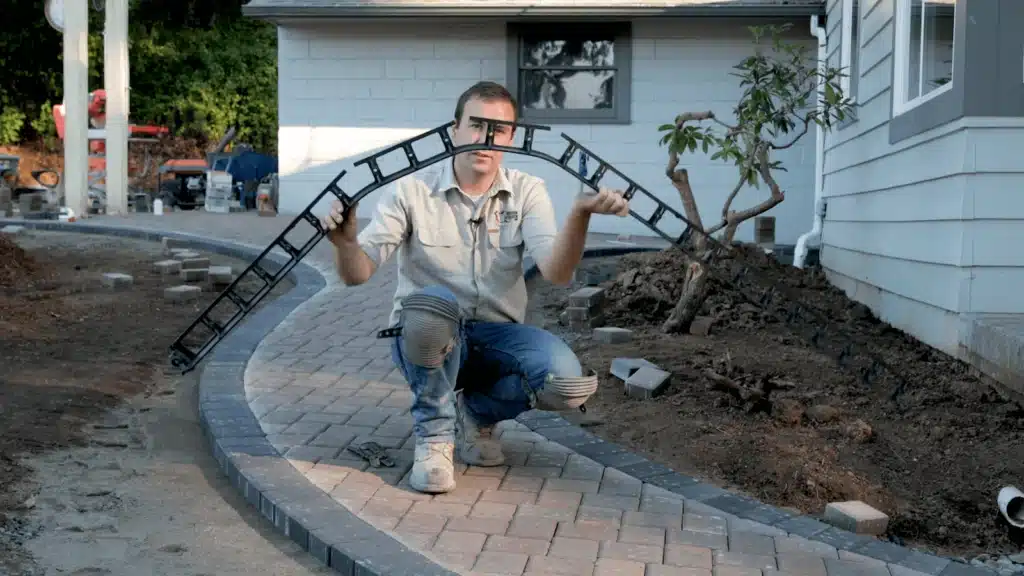
Around your curves, cut every second or third rib using snap edge cutters and so the snap edge can flex around outside and inside curves.

After you’ve installed edge restraint, be sure to cover it with extra sand or dirt so it doesn’t warp in the sun.
Step 7: Sweep-in joint sand and compact your field
The last step in your curved paver walkway project is to clear off your patio, sweep in joint sand (or polymeric sand), and compact your stones.

At this point, you’ll have laid a curved paving stone walkway. Congratulations!
We promise you’ll appreciate your pavers
Need paving stones for your curved walkway? We make paving stones and retaining wall systems just for the Northwest. Plus, we stand behind our pavers with a lifetime guarantee on their structural integrity. We’ll replace any material that proves to be defective, without cost. If you want more information, you can read our full manufacturer guarantees.
We’re also on a mission to take the hard out of hardscaping. If you want to learn more about how pavers work, how to install them, or how to repair them, watch or read our step-by-step tutorials at DIYwithWI.com.
Get our FREE Project Planning Guide
Tell us where to send it and we’ll email the backyard planning guide to you right away!
"*" indicates required fields


