
Get our FREE Project Planning Guide
"*" indicates required fields
This blog post dives into one of the first and most fundamentally important parts of any DIY paver project: how to screed (level) the bedding material you install under your pavers.
Picture this: you’re starting on a paver project and want to ensure you do everything right the first time. Maybe you understand how to do some parts of the process, but you aren’t convinced you can do all of them correctly.
Why proper bedding is important
So first, why must you have a proper foundation for your base pavers?
Preparing the base below your pavers is vital—and when done correctly, it helps ensure a finished surface that will stand the test of time.

However, proper bedding is an often overlooked but crucial part of the project. Not only does it hold pavers in place, but it also allows for easier compaction and results in a smooth surface at the end of the project. Proper bedding is integral to making pavers interlock and helps ensure that each joint is stable. This helps maintain the structural integrity of your pavers and allows for flexibility, which helps avoid cracking and shifting.
Finally, proper bedding beneath your pavers will promote proper drainage, so you do not end up with puddling during the wet months of the year.
Paver bedding material options
What are some proper bedding layer material options for your pavers? Let’s take a look:
Option 1: Washed river sand
First, let’s look at the washed river sand. Also known as Compactable Bedding Paver Sand, this traditional bedding material is a screened fine particle sand that will bind and compact for a solid surface. It is highly formable and the most-used bedding sand in the hardscape industry.

Option 2: ¼”-10 Open
The second option for bedding material is ¼”-10 Open. This clean, crushed river rock is easy to work with and is taking over the popularity of regular bedding sand because it compacts better and has better drainage in rainy climates.

How to screed bedding material
Now that you understand why proper bedding material is essential, and once you have picked out which product you want to work with, let’s look at precisely what you need to do to screed the bedding material for your project.
Step 1: Set up screed rails
First, you need to set up screed rails. You can use 1” square or round tubing, depending on what you prefer or have available.

At Western Interlock, we use square steel tubing because it is strong, straight, and easy to screed with. Ensure your rails are level, or to-grade, and sloped away from structures.
If you can’t fit a carpenter’s pencil underneath the screed rails, you’re good to go!
Step 2: Add the bedding material
Next, fill the bedding material to the top of your screed rails. You can use washed river sand or ¼”-10 Open.

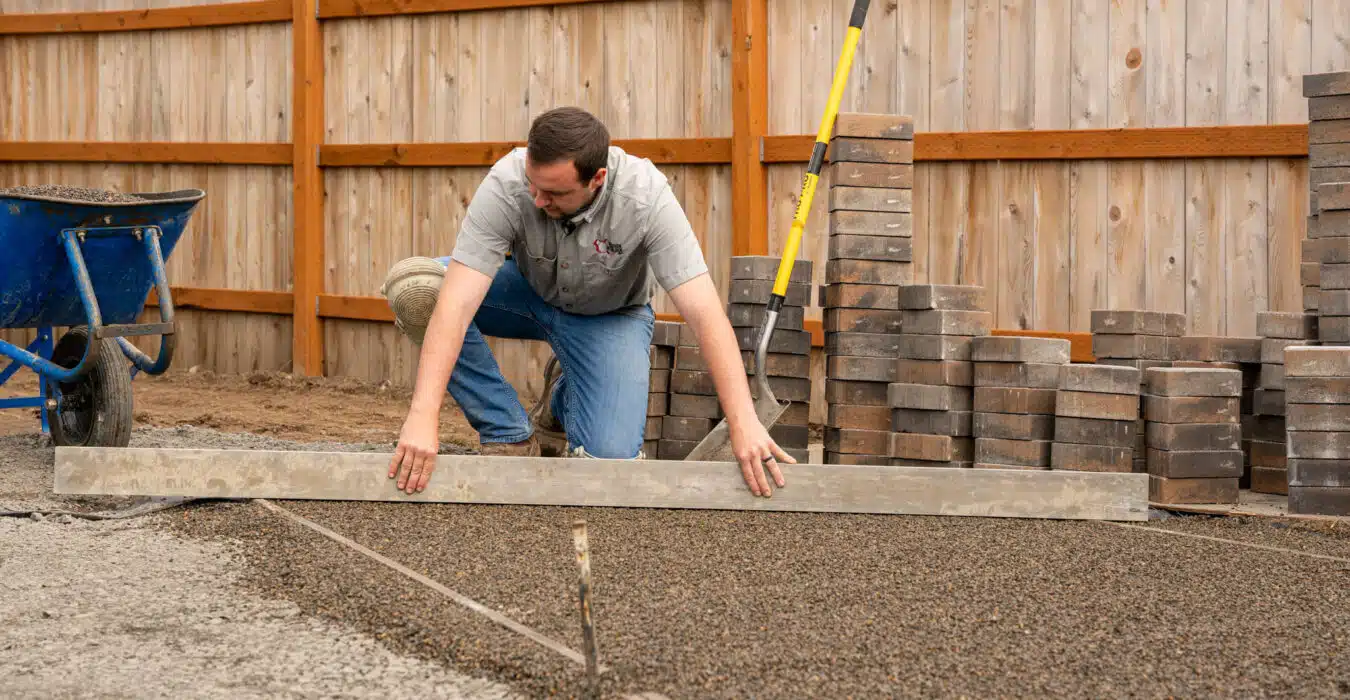
Step 3: Screed the bedding material
Now that the material is in place use a flat board or aluminum paver screed and pull it toward you until it is leveled with the screed rails.

Step 4: Remove the screed rails
Once the material is clean and level, carefully pull out the screed rails. You should try to avoid stepping on your level bed, if at all possible.

Step 5: Fill any voids
Finally, fill in any gaps by using a trowel. You should even out any space left from pulling out the rails or any accidental footprints you may have left.

Download our Paver Project Planning Guide
If you’re ready to start your paver project, check out our Project Planning Guide. You can download it for free as a helpful guide as you begin laying your pavers.
Get our FREE Project Planning Guide
Tell us where to send it and we’ll email the backyard planning guide to you right away!
"*" indicates required fields


