Step 1: Preparation
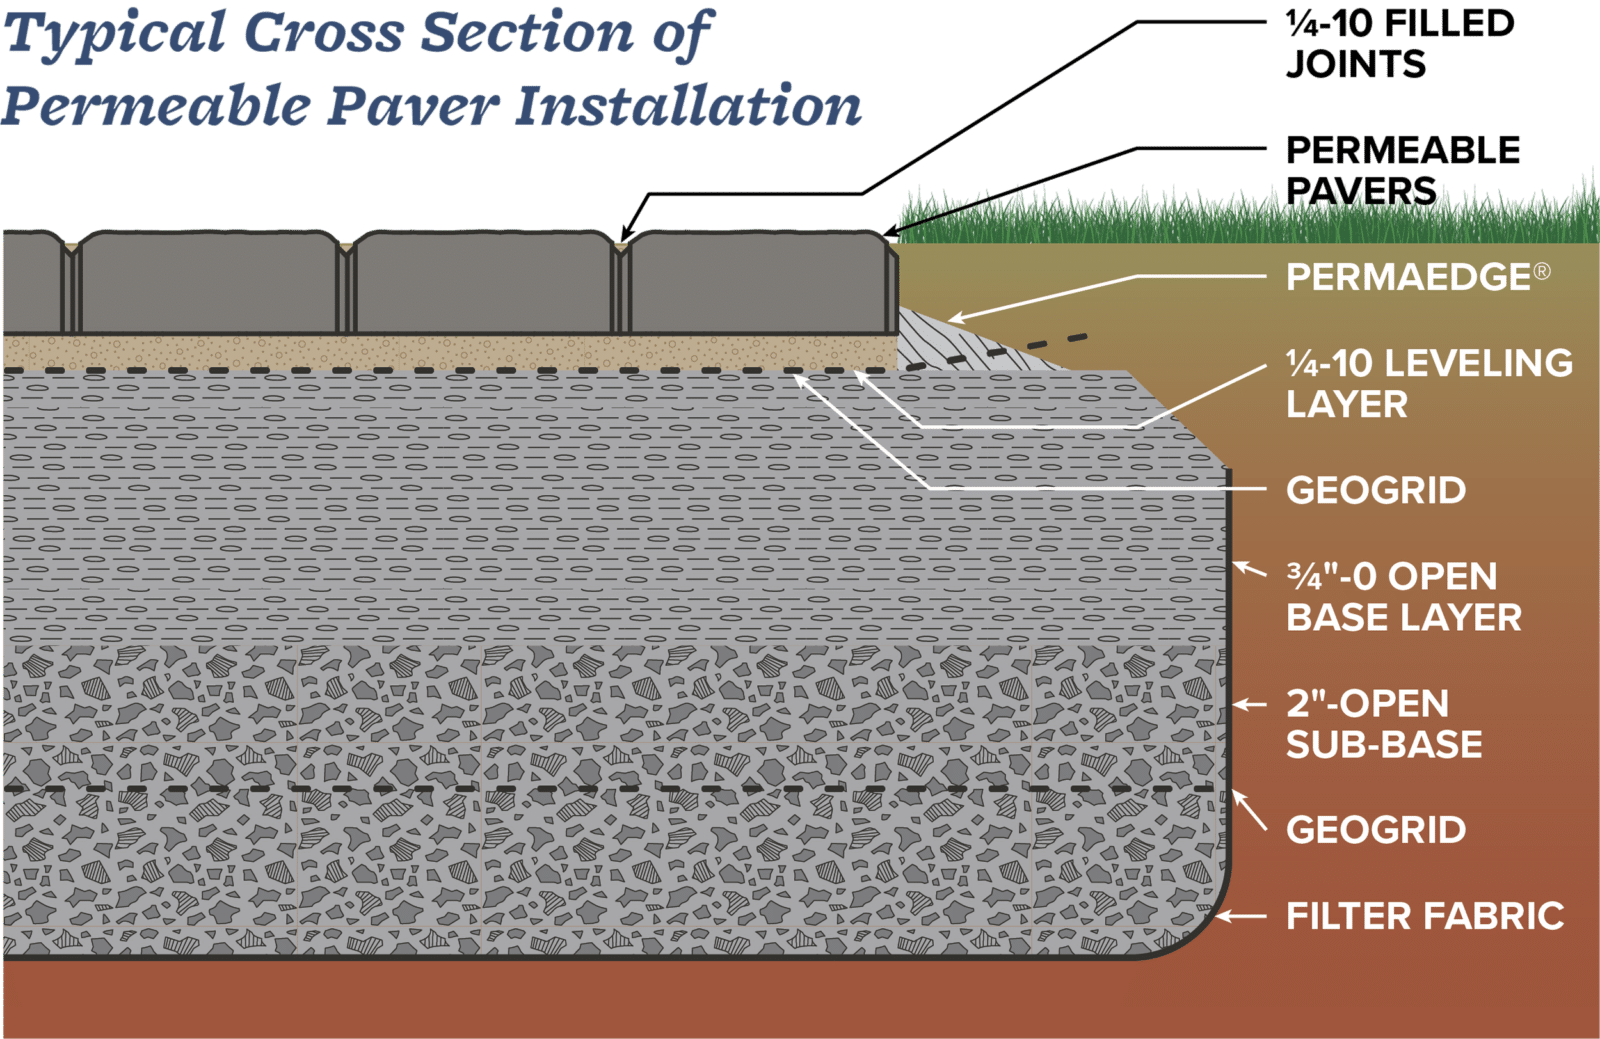
Apply non-woven geotextile to the bottom and sides of the excavated area. Start laying geotextile at the top end of the drainage slope following down with overlapping joints of 24″. Install all drain pipes, observation wells, and overflow pipes in the base, depending on their location.
Keep the area where the pavement is to be constructed free from sediment and dirt during the entire job. Geotextile, base, and bedding materials contaminated with sediment and dirt should be removed and replaced with clean materials.
Note: Non-woven geotextile is always recommended, and is placed on the compacted soil sub-grade under the open-graded base.
Step 2: Add the Sub-Base
Place, grade, and compact a minimum of 10″ of ¾” open aggregate for the base.
If more than 10″ of base is required, use a sub-base of 2″ open rock. The sub-base is typically compacted in 4-6″ lifts with a minimum 300lb plate compactor or 10-ton static roller. Make at least four passes with a maximum of 6″ of aggregate per lift, with no visible movement in the sub-base material when compaction is complete. Care must be taken not to damage the installed drain pipes during compaction and paving.
Step 3: Finish the Paver Base
After the sub-base is compacted, apply 10″ of ¾” open aggregate for the base material. The base is typically compacted in 2-4″ lifts with a minimum 300lb plate compactor or 10-ton static roller. Make at least four passes with a maximum of 4″ of aggregate per lift, with no visible movement in the sub-base material when compaction is complete. The elevation of the compacted surface should not deviate more than ± ½” over the length of a 10′ straightedge.
For increased durability and/or heavy vehicular traffic, place a bi- or tri-axial geogrid once you have 4″ of base installed and compacted.
Step 4: Add the Bedding Layer
Screed 1-1½” of ¼” #10 aggregate as a bedding layer. Do not compact this layer!
For increased durability and/or heavy vehicular traffic, in order to help hold your edge restraint, place a bi- or tri-axial geogrid on top of the base layer before screeding the bedding layer.
Step 5: Laying Your Permeable Pavers
Lay the paving stones on the bedding layer in the patterns the manufacturer recommends. Maintain straight pattern lines; use string lines if necessary. Cut pavers with a double-bladed splitter or masonry saw to fill gaps at the edges of the paved area. Compact and seat the pavers into the bedding material by using a low amplitude (75-90 Hz) plate compactor capable of at least 5000 lbs. centrifugal compaction force. During laying, all pavers within 3′ of the laying face must be left fully compacted at the end of each day.
Step 6: Edge Restraint
Install the edge restraint. We recommend a poured-in-place 6″ curb or the use of PermaEdge with geogrid. A curb is the best option for vehicular applications. If you’re using PermaEdge, pull the geogrid up into the material to lock it in place (see diagram).
Step 7: Filling the Joints
Sweep ¼-#10 into the openings, vibrating and compacting the pavers again until the material is ½” from the top surface. This will require two or three passes with the compactor. Do not compact within 3′ of the unrestrained edge of the paving stones. Remove excess aggregate by sweeping the pavers clean.
The final surface elevations should not deviate more than ± 3/8″ over the length of a 10′ straightedge. The final surface elevations should be 1/8 – 1/4″ above adjacent drainage inlets, concrete collars or channels.