Western Interlock paving stones are easily installed by homeowners. No prior experience is needed, just careful work and attention to detail. The following step-by-step instructions will help you achieve beautiful, long-lasting results.
Tools Needed:
Shovel
Rubber Mallet
Stakes and String-line
Level
Snap-Edge® Edge Restraint
Gravel
Hand Tamper
Plate Compactor
Materials Needed:
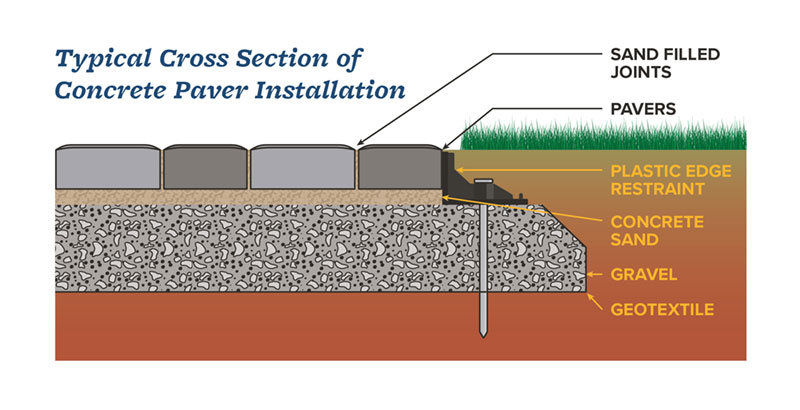
Gravel base: ¾” minus crushed rock; typically 4″-6″ of compacted base should be used for light vehicular and pedestrian traffic, or 6″-12″ for heavy vehicular or industrial traffic. When using a 4″ base, 1 yard of gravel will cover 80 square feet.
Bedding Sand: Coarse concrete sand is recommended. A uniform depth of 1″ of sand is recommended. 1 yard of sand covers 200 square feet.
Pavers: Determine the total square footage of your project (length x width = square feet) adding 5-10% for cuts and extra pavers that might be needed later. To estimate the number of pieces you will need, multiply the square footage by the pieces per square foot. (Square foot x Pieces per square foot = Total number of pavers needed)
Edge Restraint: All exposed edges (not up against a permanent structure) must be restrained. Measure the linear feet of all exposed edges to determine the amount of edge restraint needed.
Installation:
STEP 1: Design
First, you will want to measure out your area and draw a print of your project to determine what you will need.
STEP 2: Layout
Next, spray paint the design outline on the ground with white marking paint. Be sure to add an extra 6″ on all sides that need edge restraint. Use a string and stake or a garden hose to mark radiused corners.
In order to properly shed water, your project needs to be sloped away from any structures. Use a level (line or laser), to establish a finished grade slope of at least ⅛” per linear foot.
STEP 5: Excavate
Once you have the grade and your lines set, you can begin to excavate. Excavate the soil 6″-8″ below finished grade depending on your application type. Areas that will receive vehicular traffic will require more excavation than areas that only receive pedestrian traffic.
STEP 6: Set the base
Place the ¾ minus gravel base, and compact to 3″ from finished grade. The base needs to be smooth and even, as any surface imperfections will be obvious in the final product.
STEP 7: Screed the sand bed
You have your base laid now. Next is to screed sand to a uniform 1″ depth, using 1″ thick material (such as 1″ metal tubing, square or round, or 3/4″ PVC pipe) for guides.
STEP 8: Lay the stones
Now you’re ready to start laying your pavers. Starting at the 90° corner, lay the pavers, keeping the joint lines straight by using a string line. Use the click-drop method to lay the stones. To do this successfully, you’ll first want to click the stone tight against its neighbors, then drop it into place. Do not scoot pavers on the sand bed.
STEP 9: Install edge restraint
You’ve got all of your pavers laid out. Great work! Next is a critical step to maintaining the longevity of your project, paver edging. Set the edge restraint on the gravel (remove excess bedding sand if necessary), and secure it down using 10″ spikes in every third hole. Then, you’ll want to compact the paving stones.
STEP 10: Finish
The final step is to sweep the stone joints full of concrete sand and then compact again. Once you are done compacting, sweep off any remaining sand, pull up some chairs, and enjoy your new patio!
Need your own copy? Download a PDF of these instructions here