

Get our FREE Project Planning Guide
"*" indicates required fields

Over the seasons, your paving stones have been exposed to sun and rain, they’ve ever so slightly expanded and contracted from hot and cold temperatures, and sneaky weeds and insects have snuck in.
You can trust that Western Interlock’s hardscape is resilient. In fact, we’ve seen our stones still look great after 30 years. But that doesn’t mean it doesn’t fall prey to the realities of our ecosystem.
So if you have any of these issues, how do you deal with it? Should you scrub your stones with a brush or blast them with a pressure washer? Should you scrape away growth or use rinse-away products? Hardscape cleaning and maintenance can feel intimidating, but it doesn’t have to be. In this article, we’ve got the answers you’re looking for.
Here are the five hardscape cleaning and maintenance methods we’ll cover.
- Spot cleaning
- Bleach rinse
- Acid wash
- Large surface cleaning
- Pressure washing
In the next few paragraphs, we’ll show you which method to use depending on what kind of elements you’re dealing with. We’ll also show you how to approach each method so that your hardscape stays strong and beautiful.
Spot cleaning
Whether you’re working with ants and insects, moss and weeds, or motor oil, you’ll likely have to do some spot cleaning on your hardscape. In this first section, we’ll explain how to spot clean effectively in a variety of circumstances.
Ants and insects
- Difficulty: 1
- Cost: 2
- Est. time: 30 minutes
- Tools: Screwdriver, brush or broom, hose
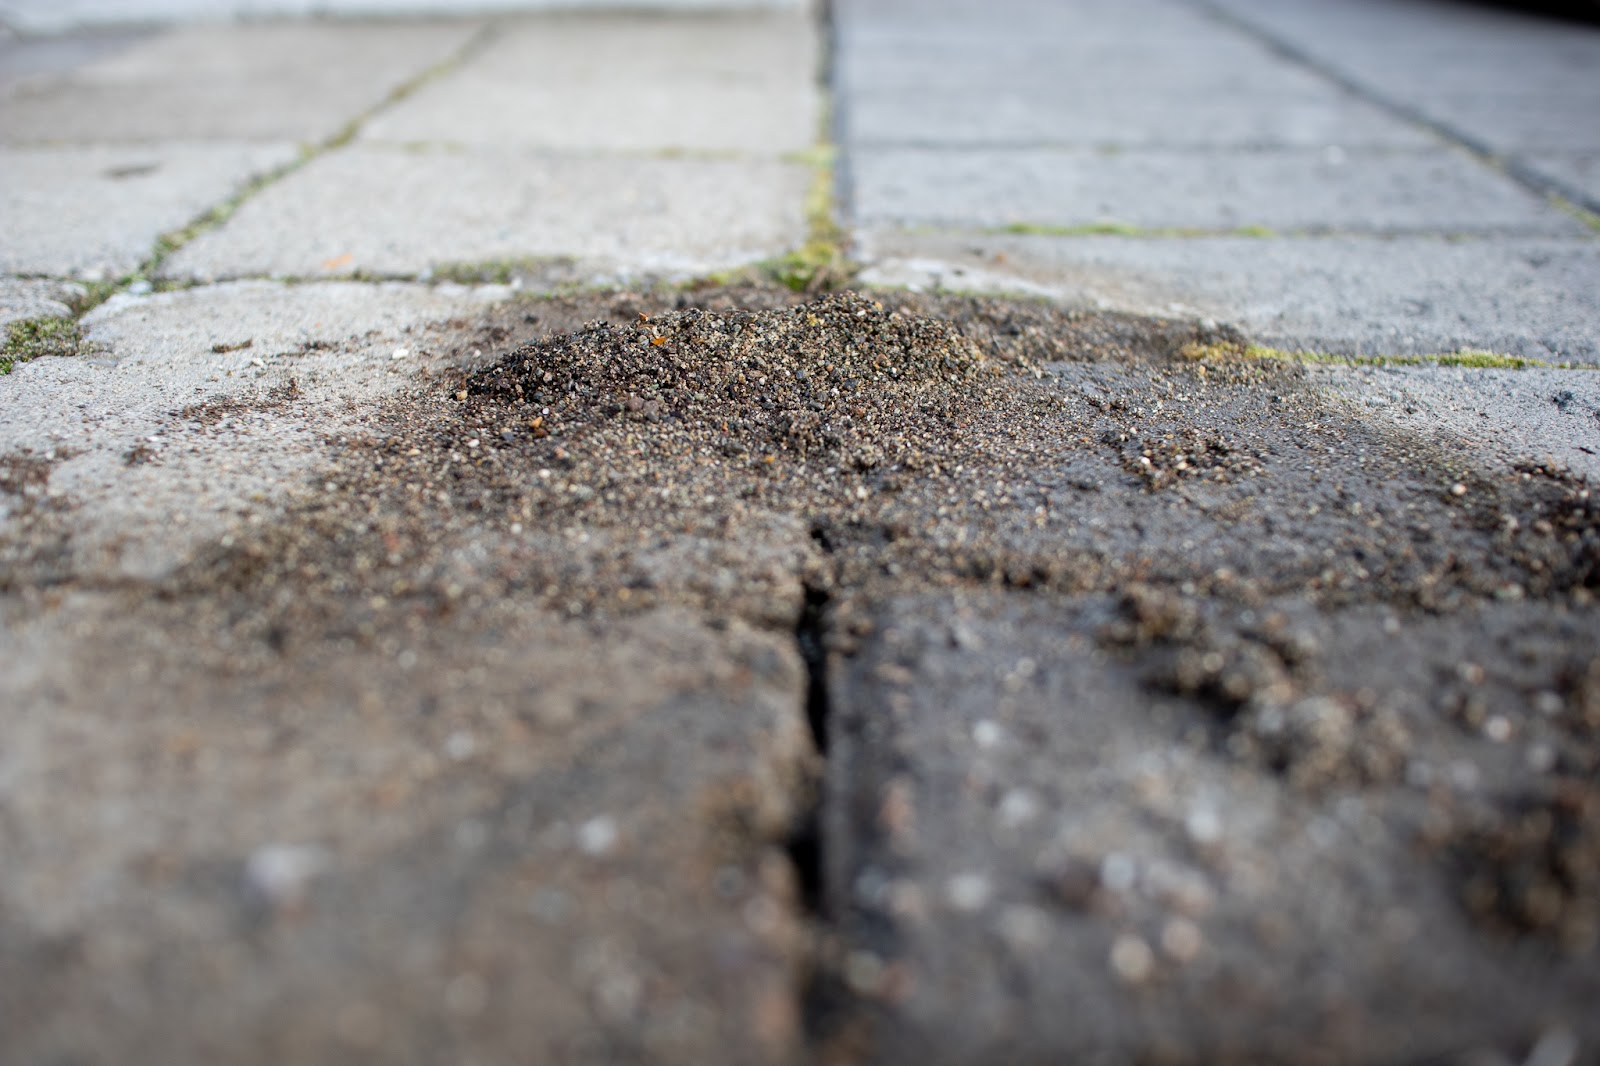
Ants and insects sure know how to mess up hardscape. Sometimes they’re blatant and they’ll dig up your sand right in the middle of things. Other times they’re sneaky and they’ll dig up sand under a potted plant or doormat. Either way, if you’ve noticed any signs of ants or insects, you’ve got a problem.
The first step to fixing this problem is to get to the root issue and kill the ants or insects. For this, we recommend applying an Insecticide called Tempo SC. Apply the product to the insect’s exit hole, following the manufacturer’s instructions.
Next, you’ll want to replace the sand between your pavers. You might be able to simply sweep the sand mound right back into the hole. But depending on the severity of the ant or insect problem, you may have to backfill with additional sand. After you’re done, simply sweep away the excess sand or use a hose to spray the surface of your hardscape clean.
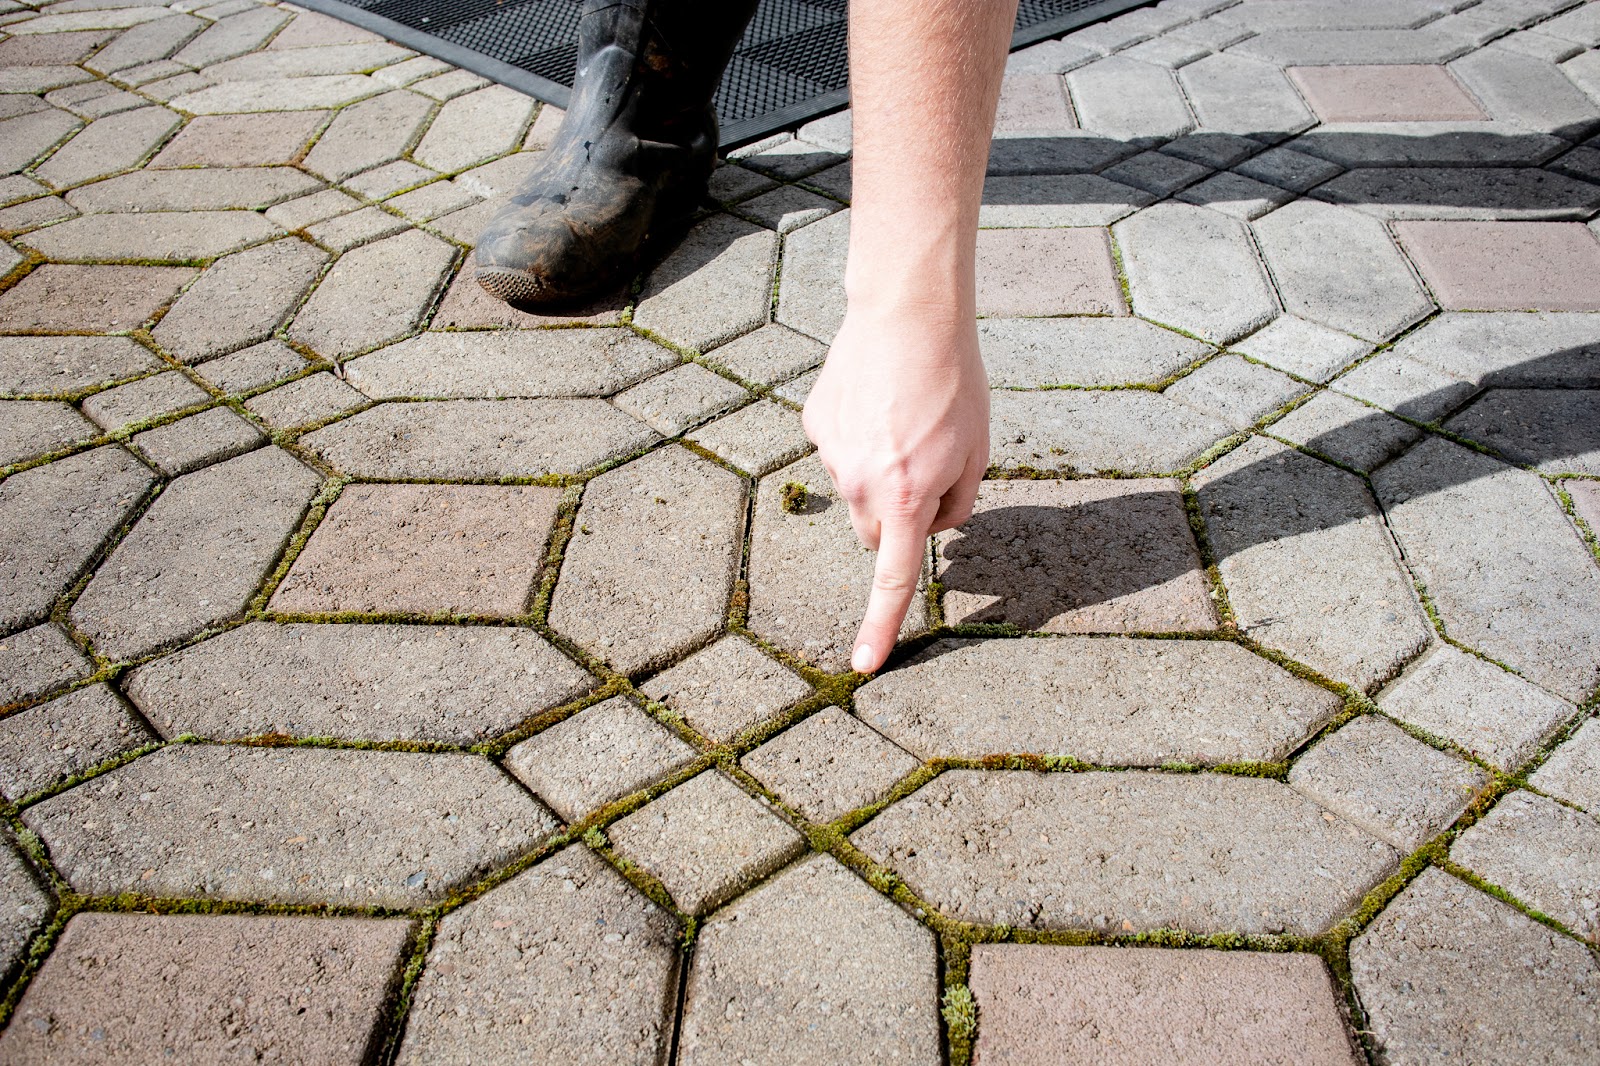
Moss and weeds
- Difficulty: 1
- Cost: 1
- Est. time: 1–2 hours
- Tools: Screwdriver, brush or broom, hose
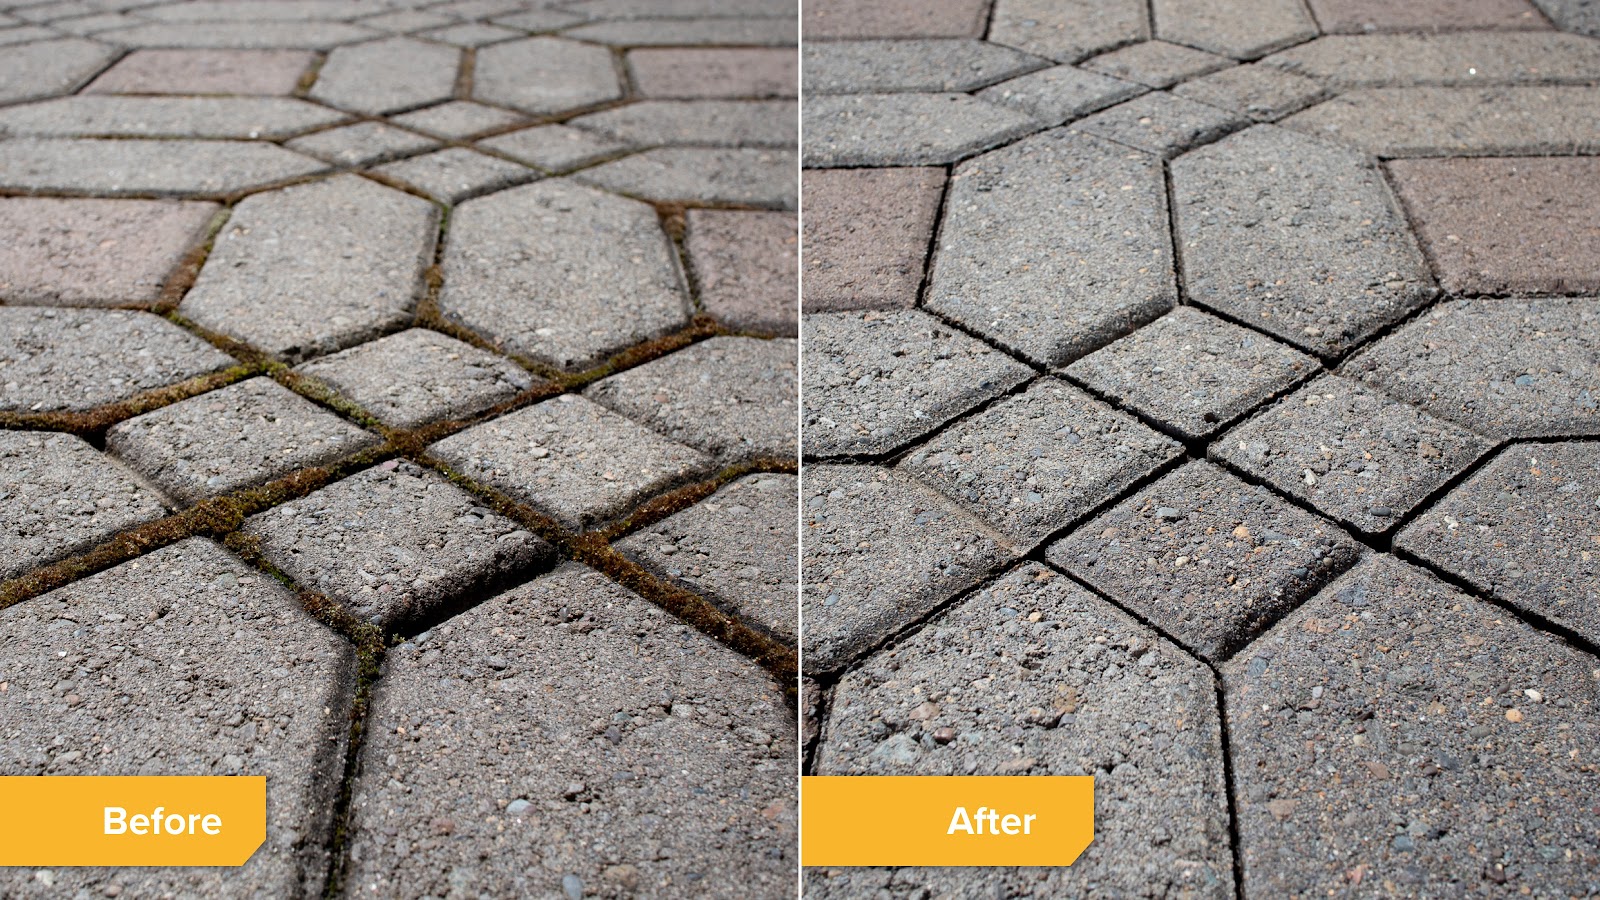
Since Western Interlock is based in Oregon’s Willamette Valley, we deal with a lot of moss. If you’re in the area, you probably do too. But the thing with moss is that it doesn’t grow everywhere. Sometimes it grows only in a few shady, moist areas. You might have a similar situation. If so, here’s how to spot clean your moss.
Note: If you have moss, algae, or fungi growth on the entirety of your hardscape’s surface, read our recommendations on bleach rinse and large surface cleaning below.
First, scrape it with a flathead screwdriver. We recommend that you place your screwdriver head in a vertical position so that while you break apart the moss, you don’t scrape away the surface of your pavers.
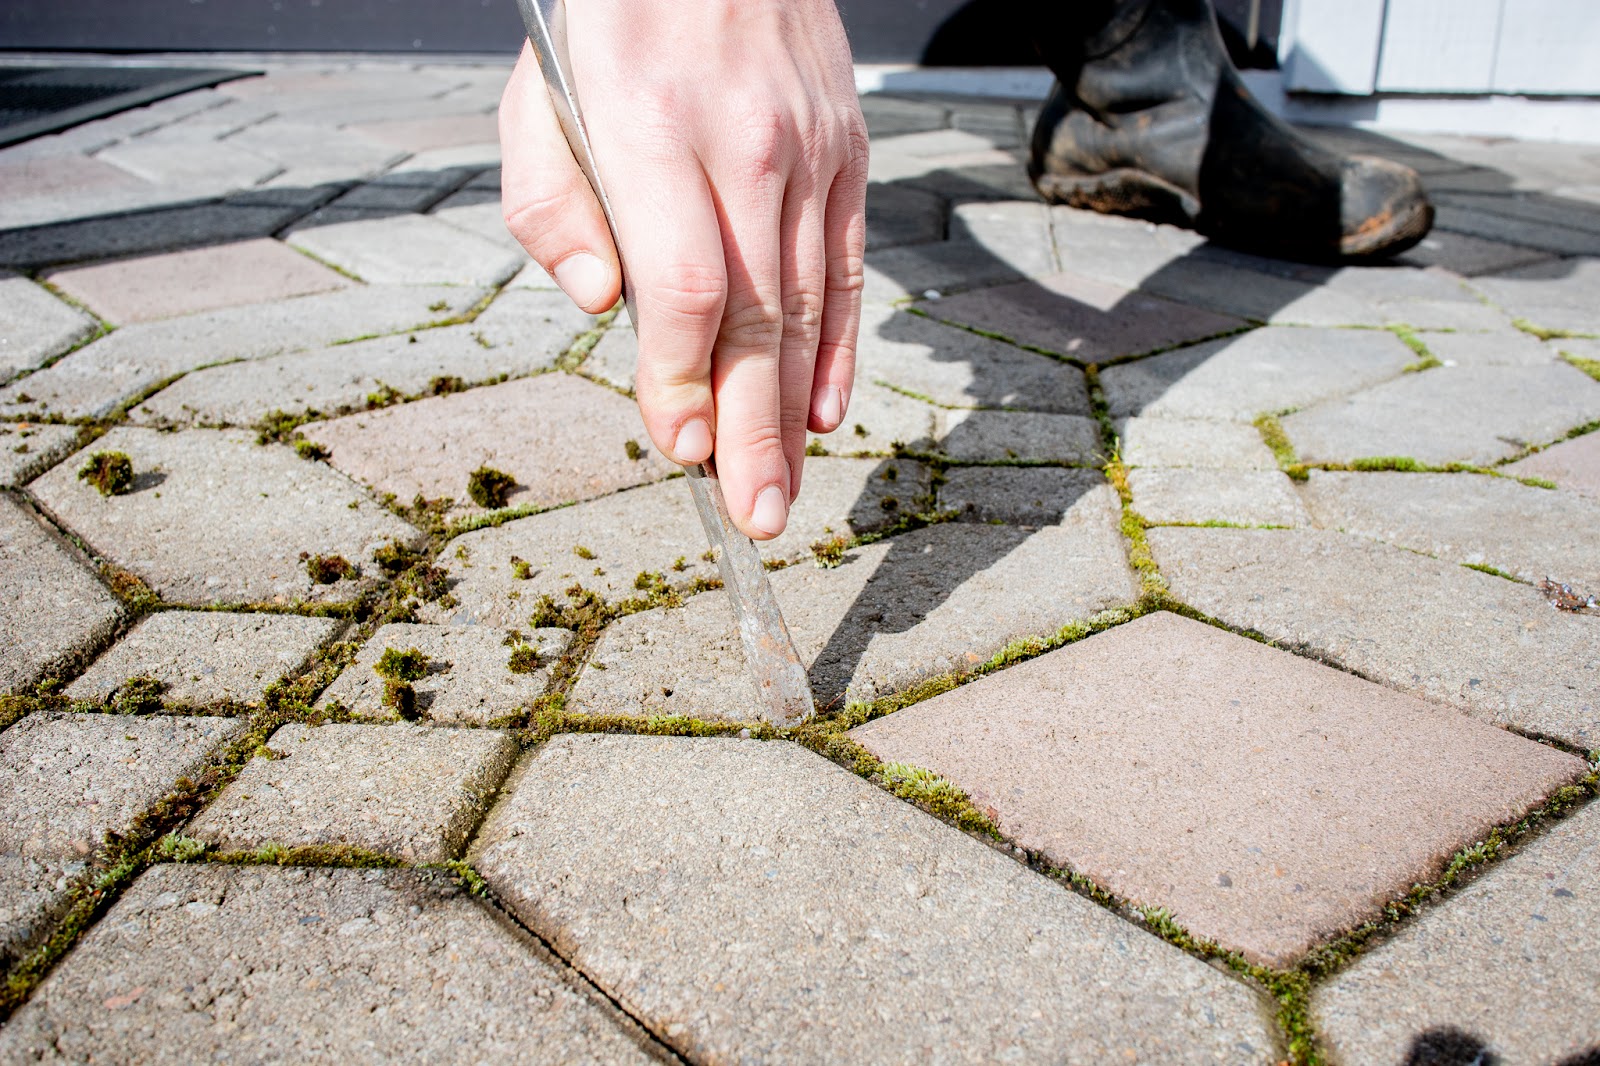
Second, brush away the moss remains with a broom or brush. After you use the screwdriver method, moss and sand will be laying on the surface of your hardscape. That’s okay, we’ll backfill the sand later. Simply brush away the residue using a hard bristled broom or brush.

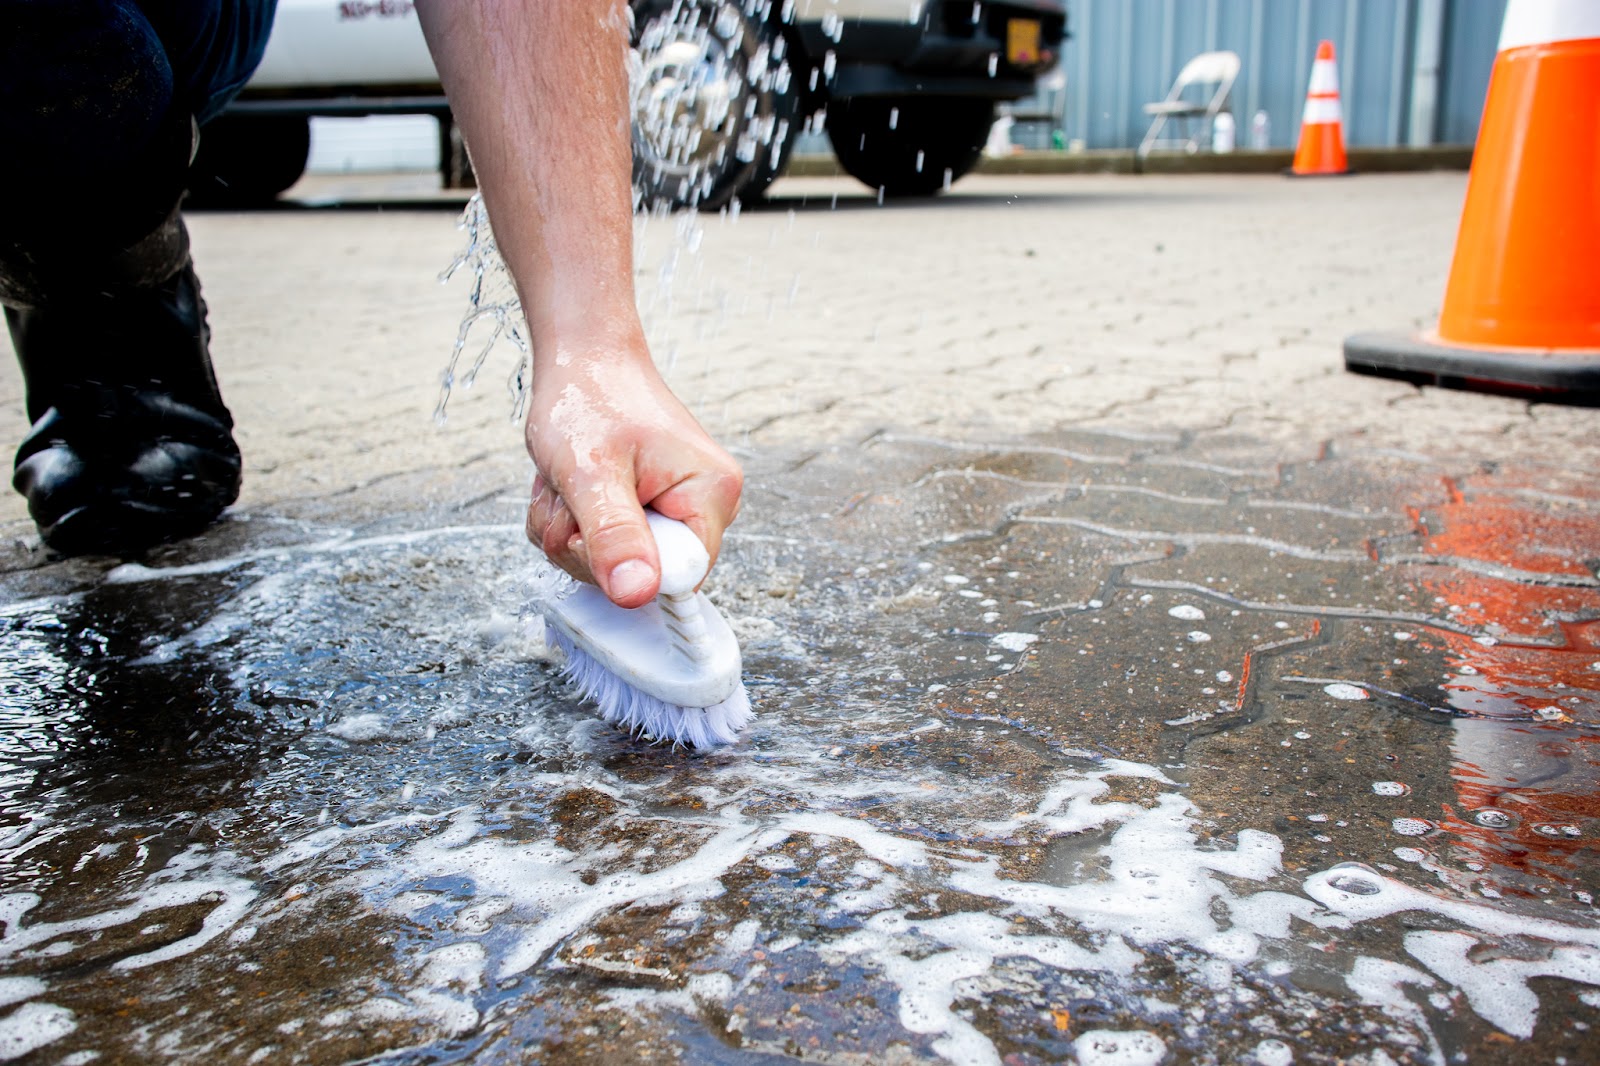
Motor oil
- Difficulty: 1
- Cost: 2
- Est. time: 1-2 hours
- Tools: Brush, hose
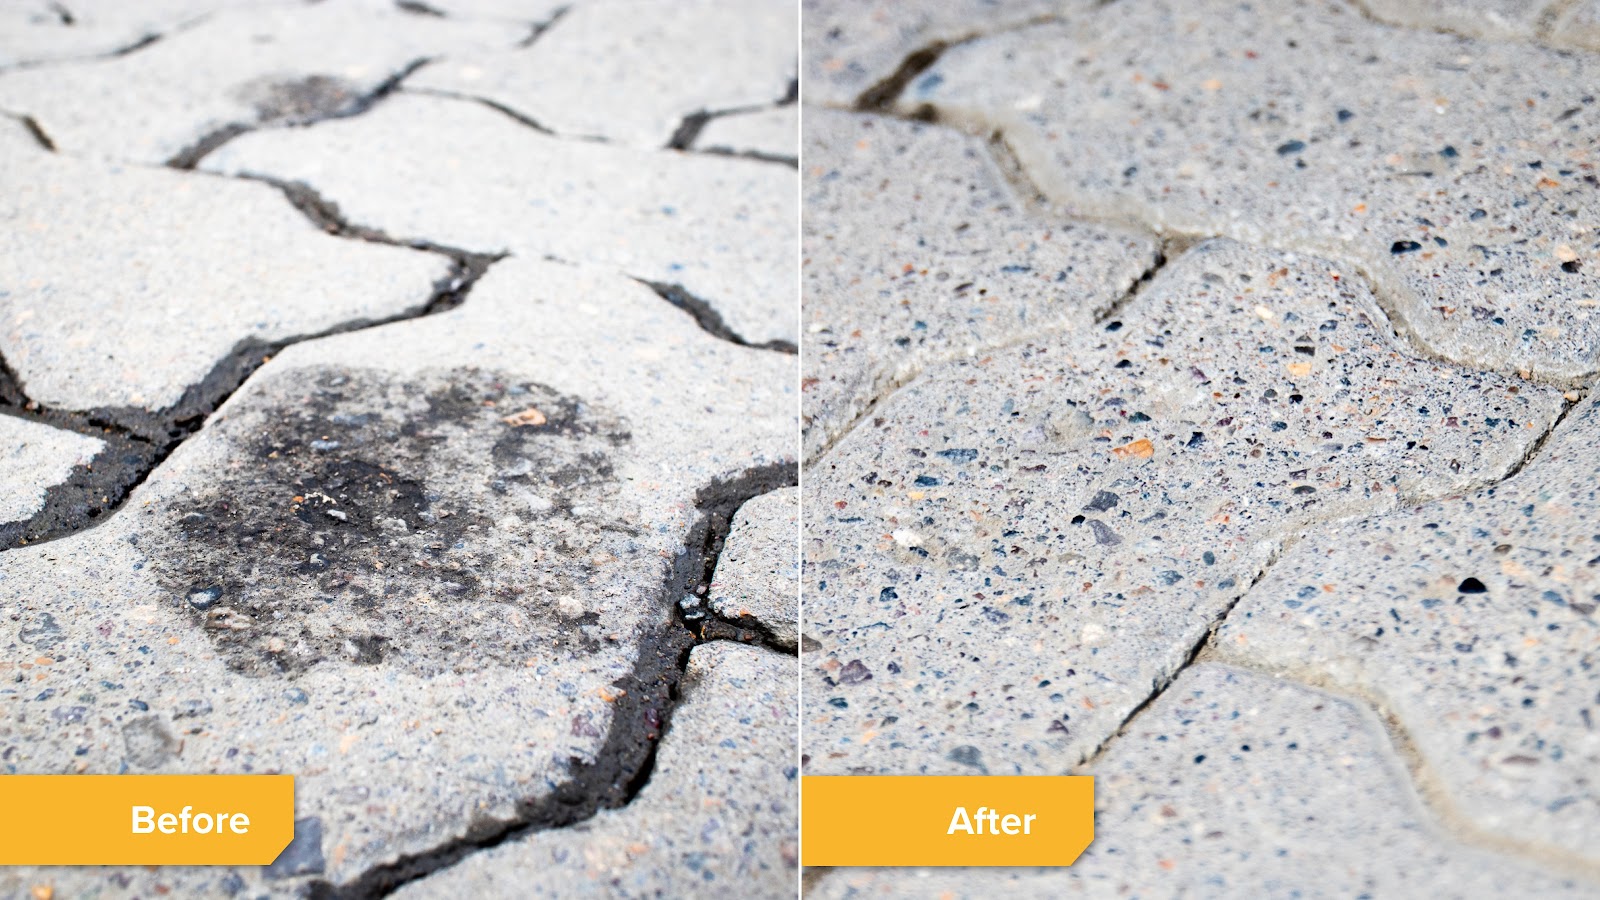
If you have a paver driveway, you’ll be hardpressed to not ever deal with motor oil drips or spills. At first, these black stains can seem scary—and it can feel like you’ve ruined your beautiful pavers forever! Well, you didn’t. Here’s how to clean it up.
First, use our favorite oil stain cleaner: Surebond Oil Extractor. Pour it on liberally, following the manufacturer’s instructions.
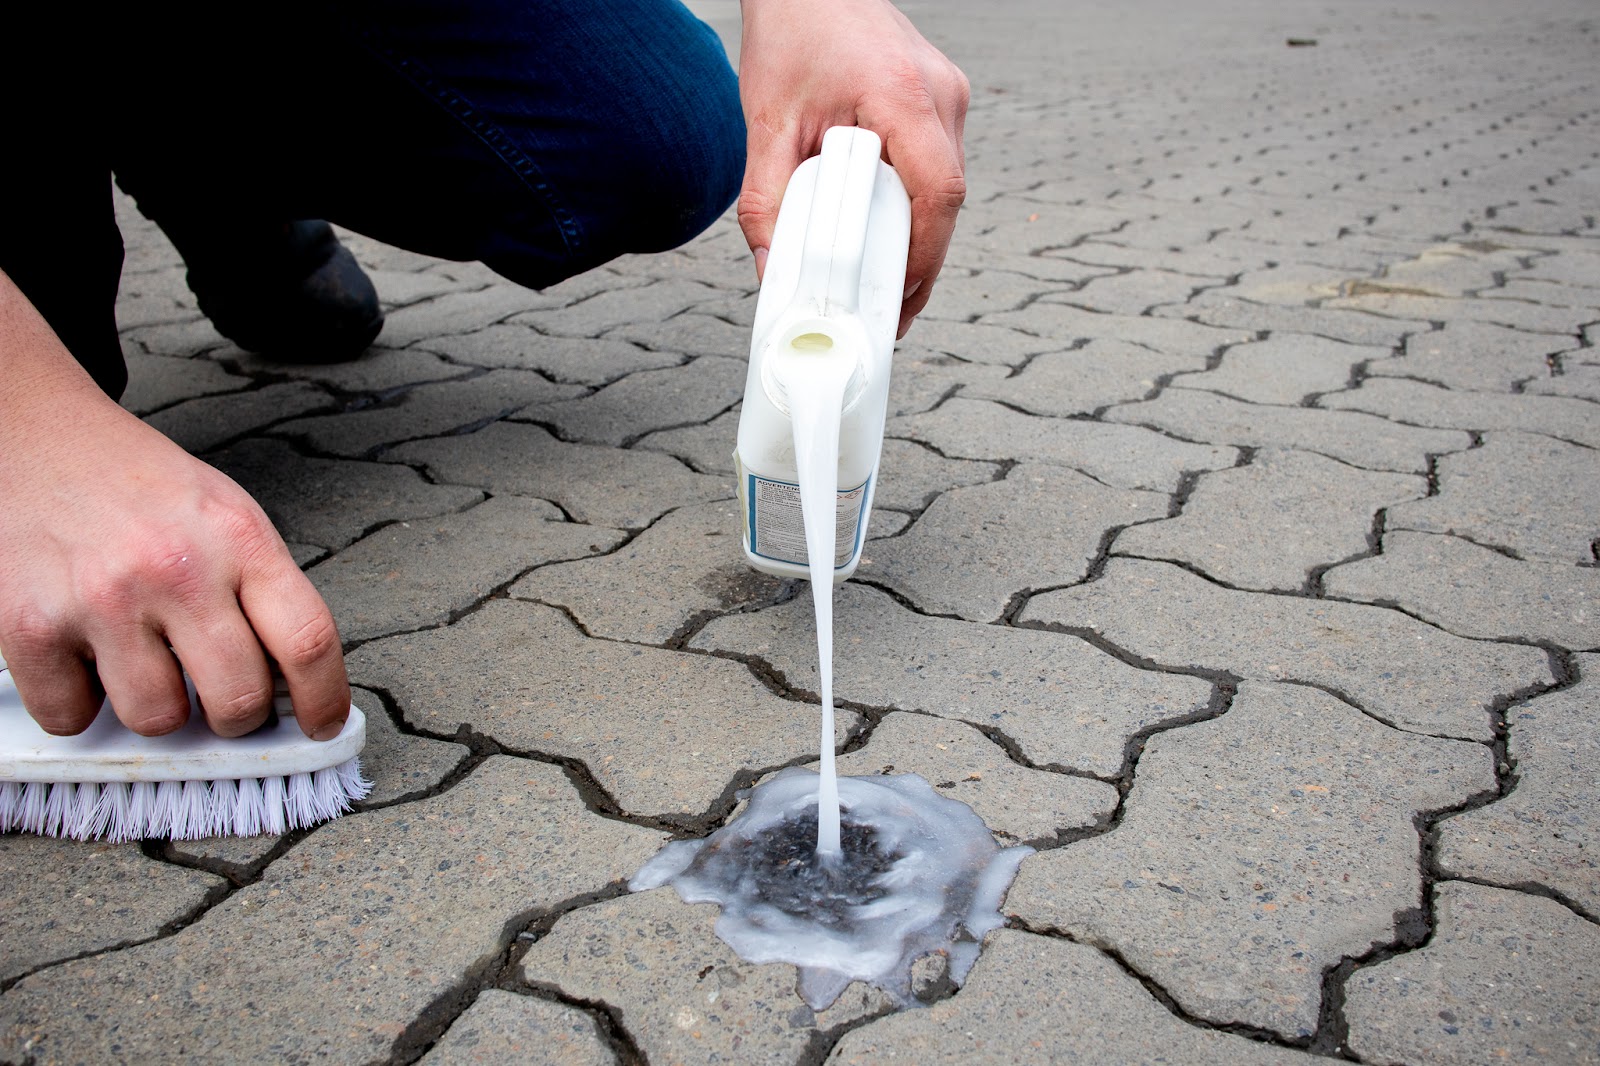
Second, scrub it in using a small, handheld brush and let sit for 30 minutes. While our oil stain cleaner was sitting, we took a break and enjoyed some time together. While cleaning and maintaining hardscape isn’t difficult, it can be exhausting. Why not use this time and put a steak on the grill or spark an encouraging conversation with your neighbor?
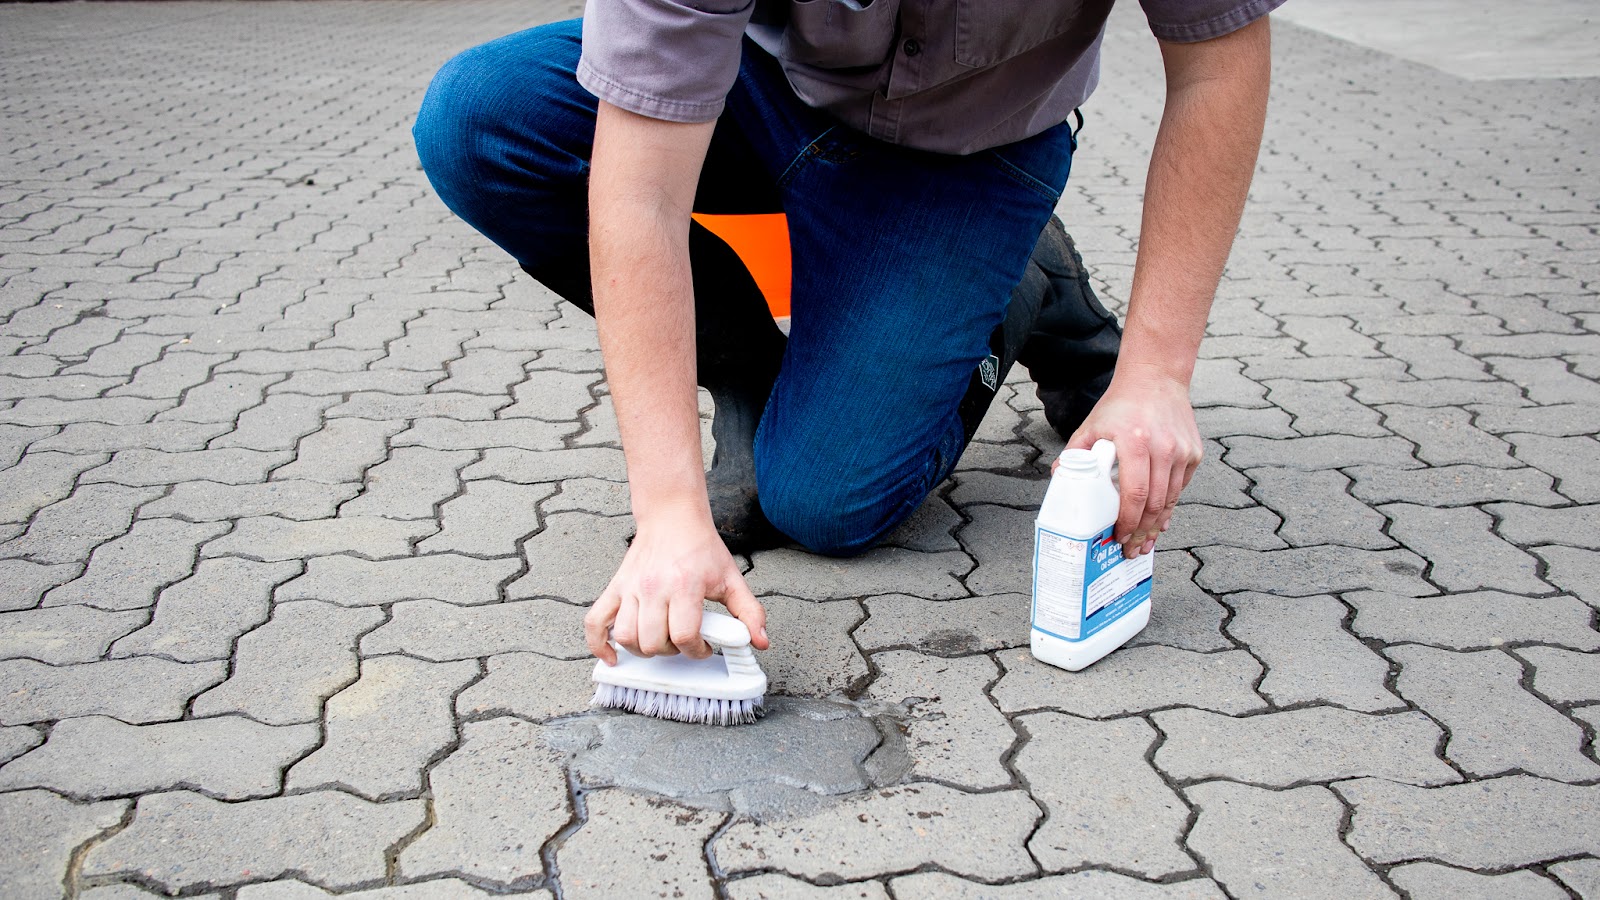
Third, rinse using hot water. While rinsing, we used our brush and scrubbed at the oil stain for good measure. Depending on the size and severity of your oil stain, you might consider using some additional elbow grease as well. If the stain is persistent, simply repeat the process another time or two and your pavers will be as good as new.
Bleach rinse
- Difficulty: 1
- Cost: 1
- Est. time: 30 minutes
- Tools: Bleach, watering can, hose
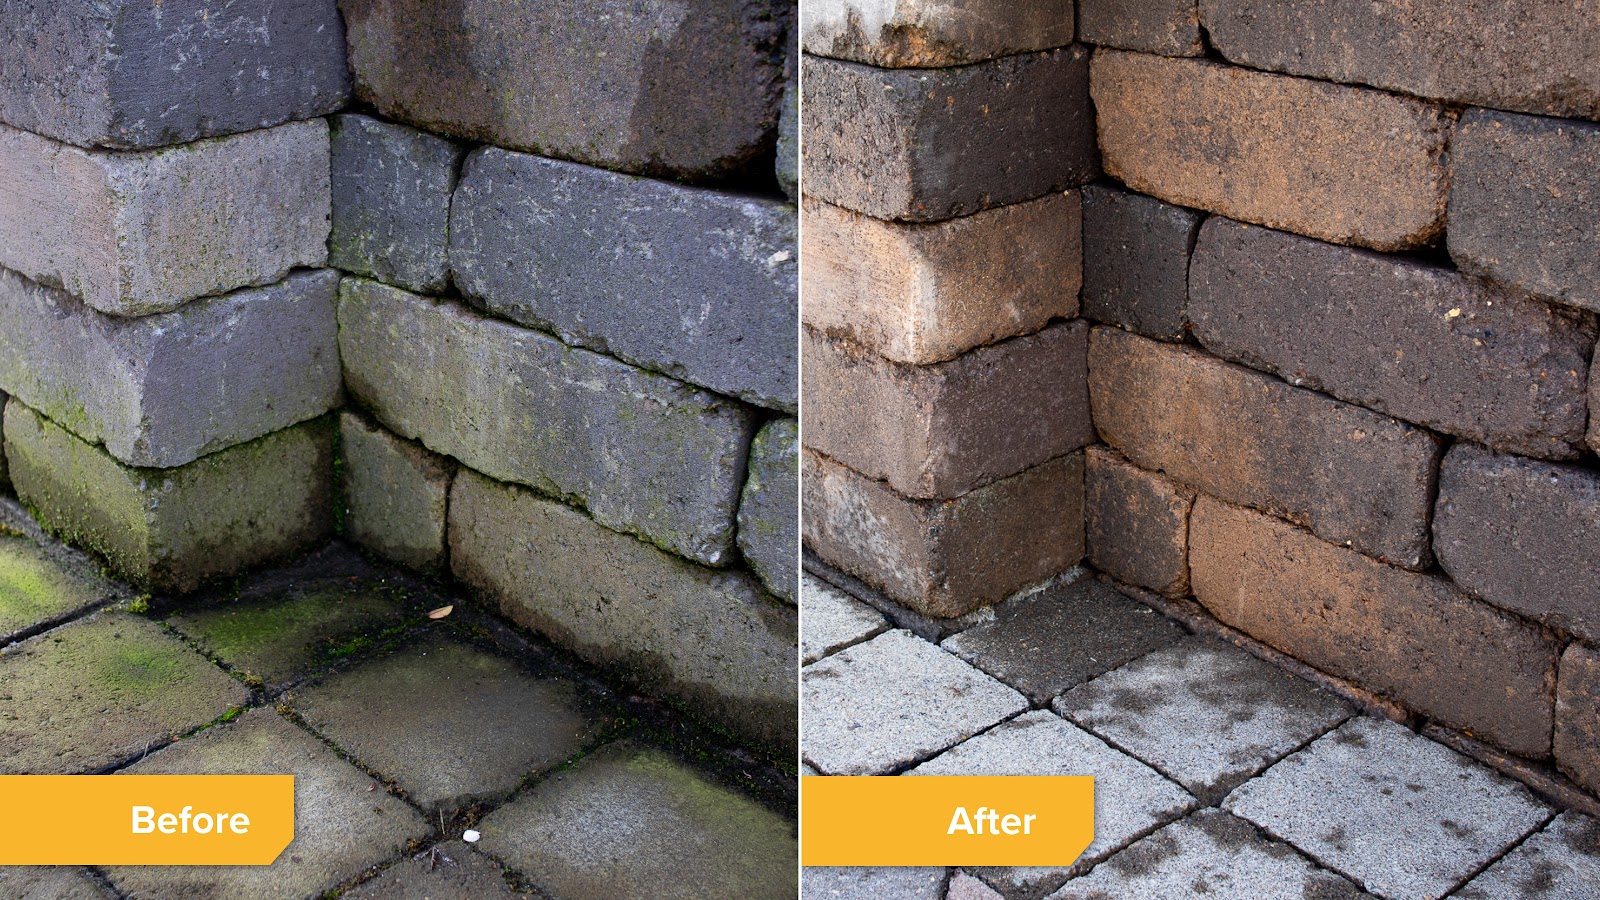
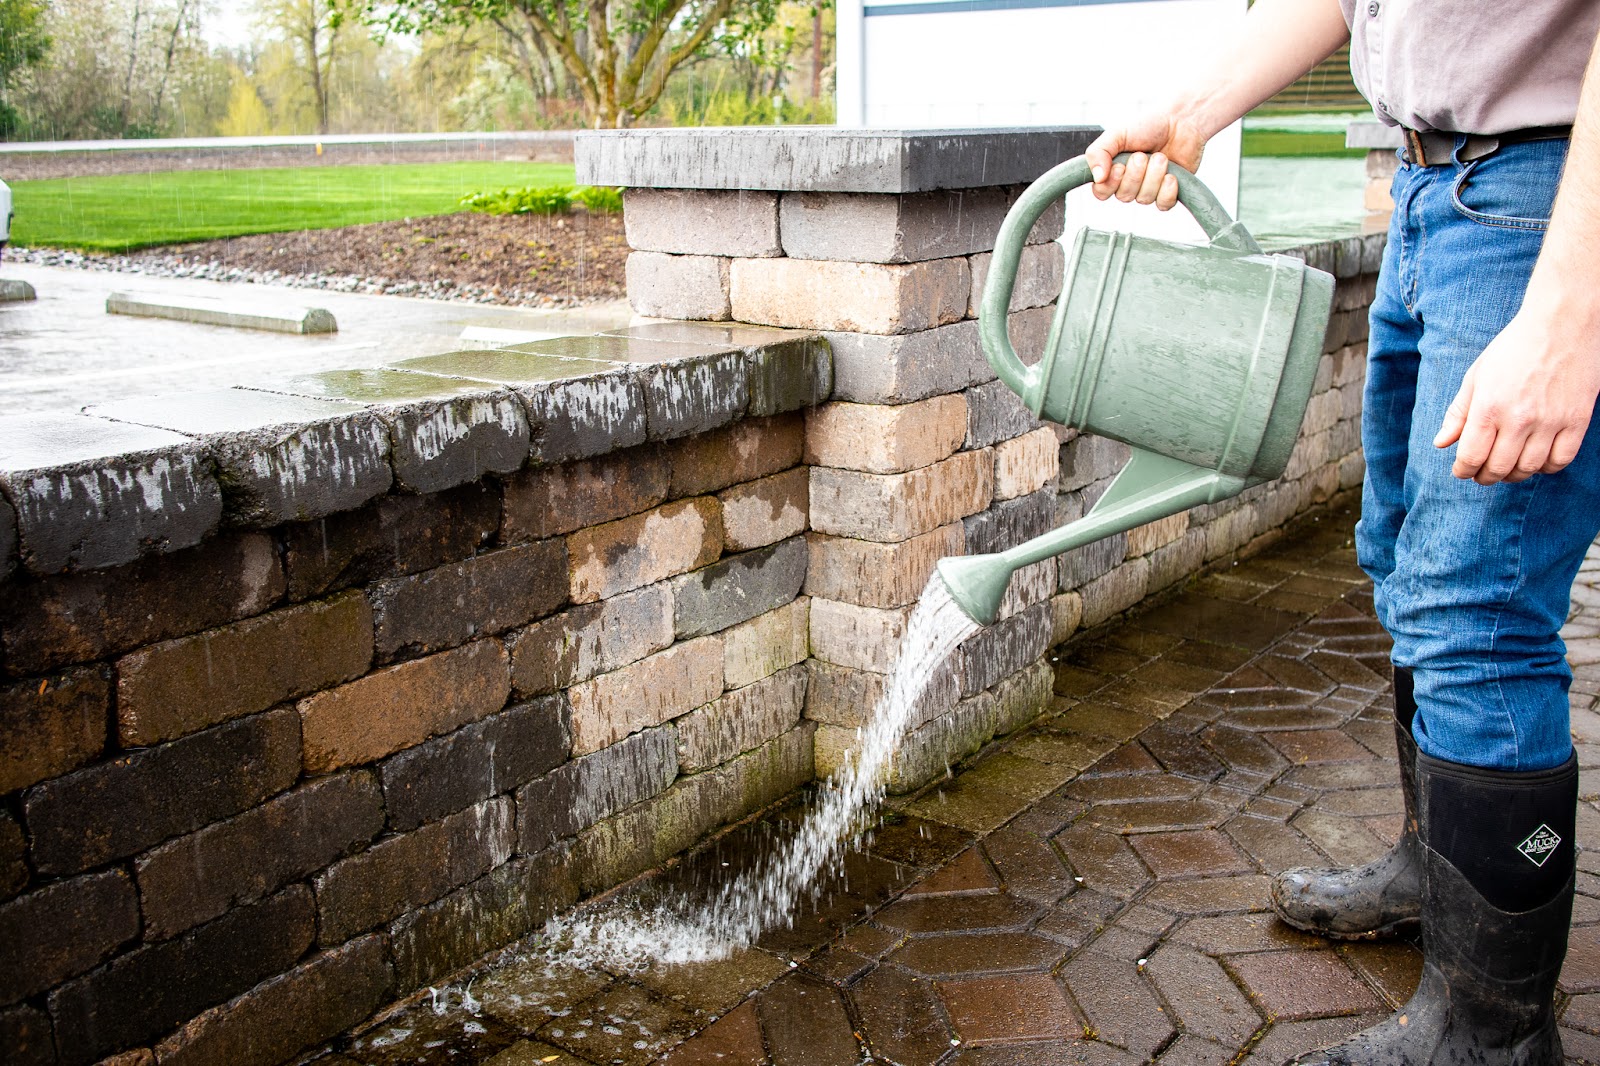
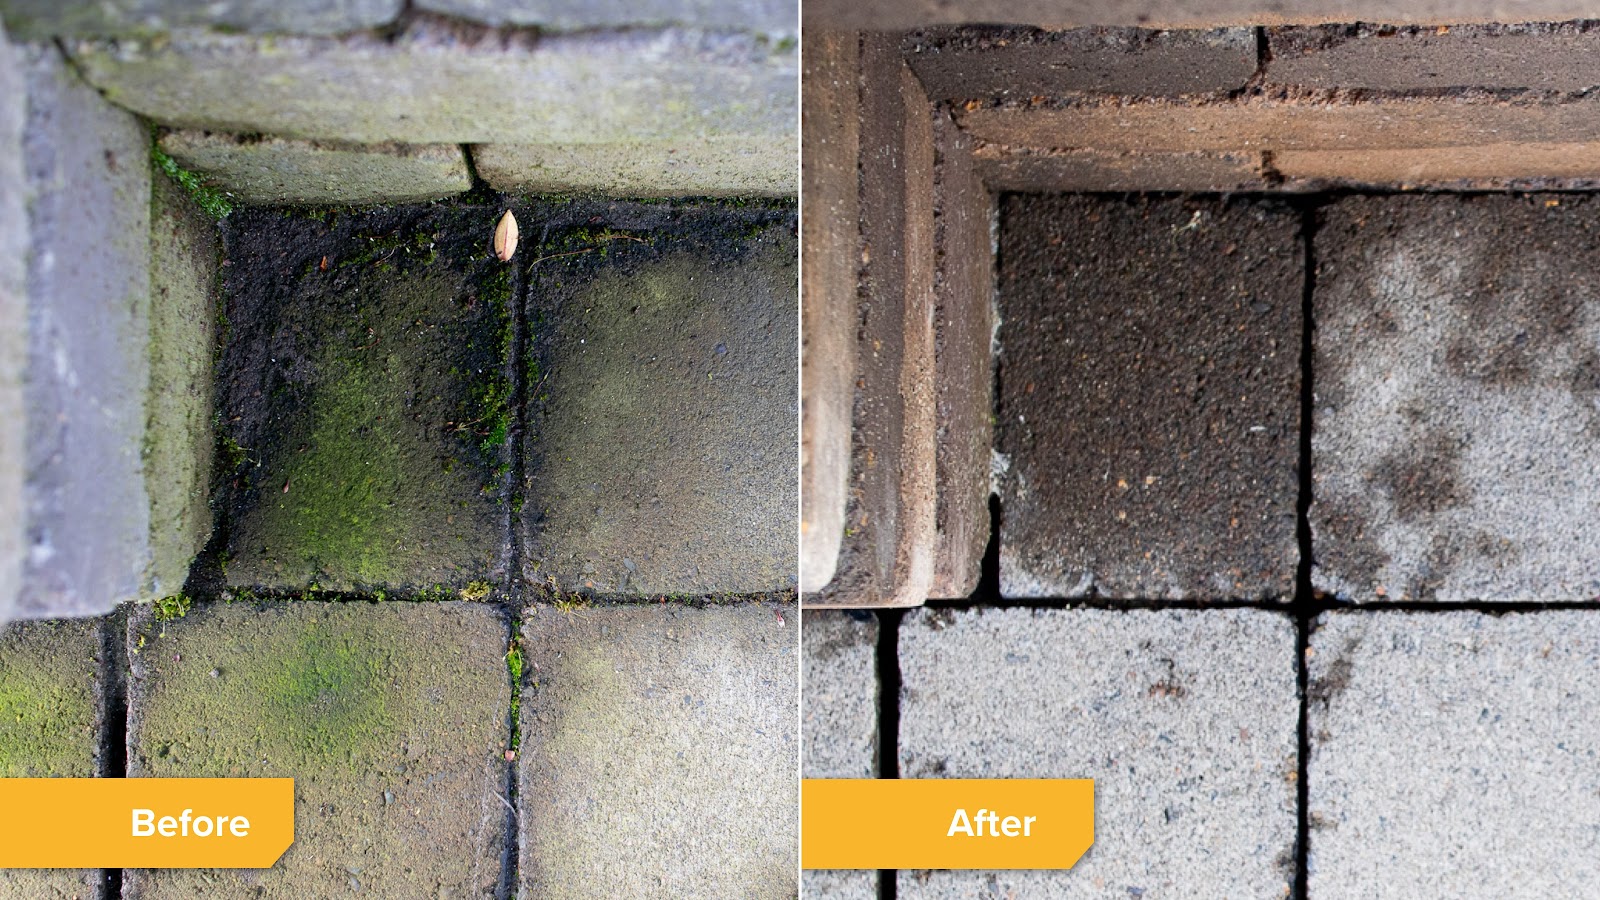
If you live in a climate that’s conducive to moss, it’s likely you’ll experience other fungi growth like algae. As you can see in the picture above, algae are both black and green and will grow on ultra moist areas of your hardscape such as corners and edges. In our example, algae growth extends onto the lower wall and ground around the foundation because of splash back from frequent rain.
It can be easy to pull out your pressure washer for any hardscape cleaning job. But often it’s not necessary and can disrupt your stone’s joint sand, whether standard sweeping sand or poly sand; or any sealer that has been applied. That’s why we recommend that the best way to combat algae is with a bleach rinse.
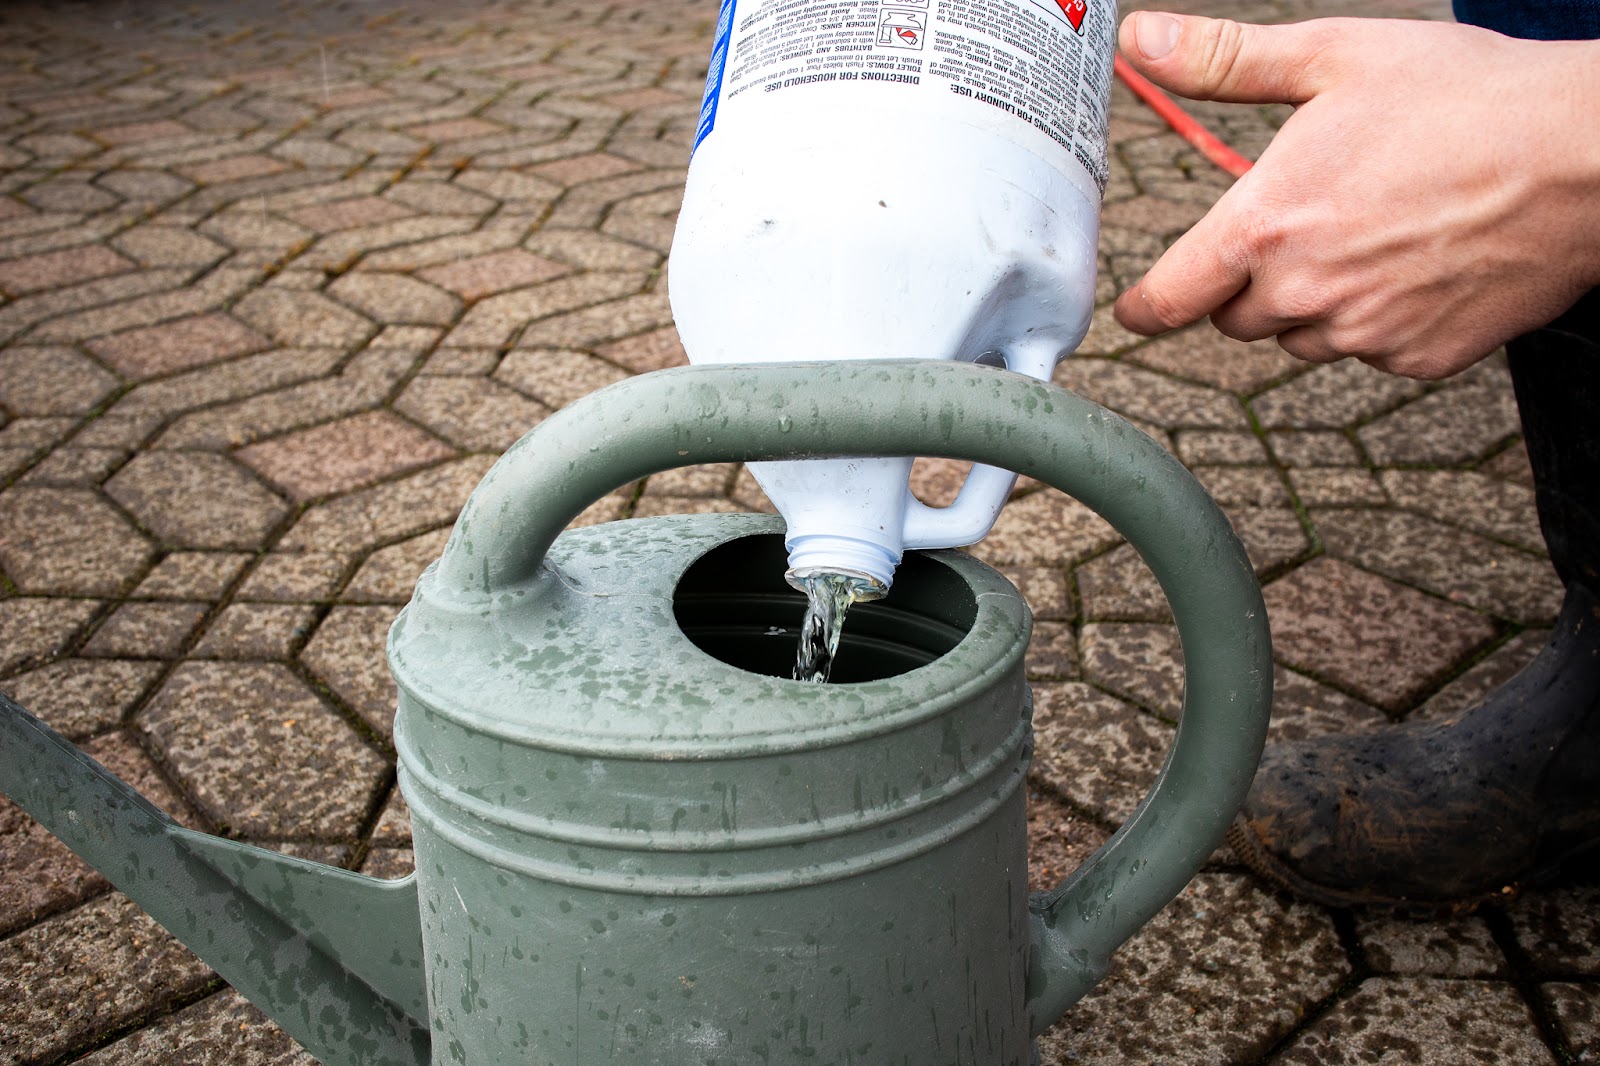
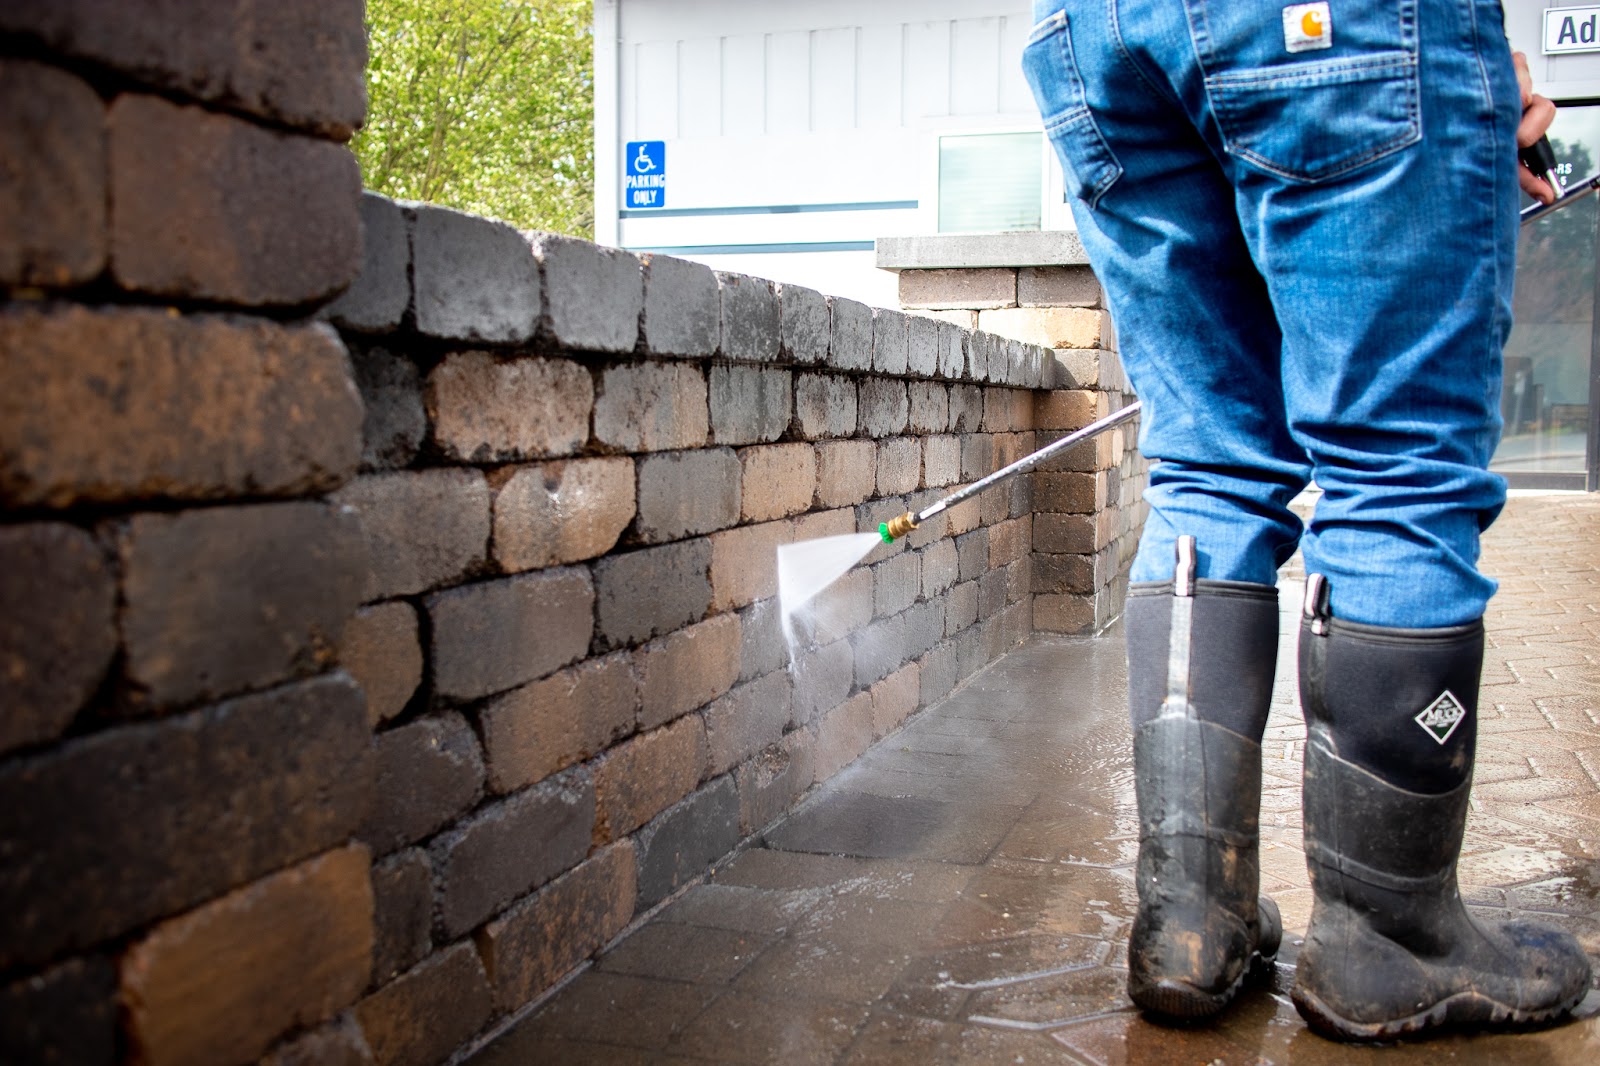
First, mix a 50/50 bleach and water solution in a watering can. Add the bleach first then add cold hose water to help mix the solution.
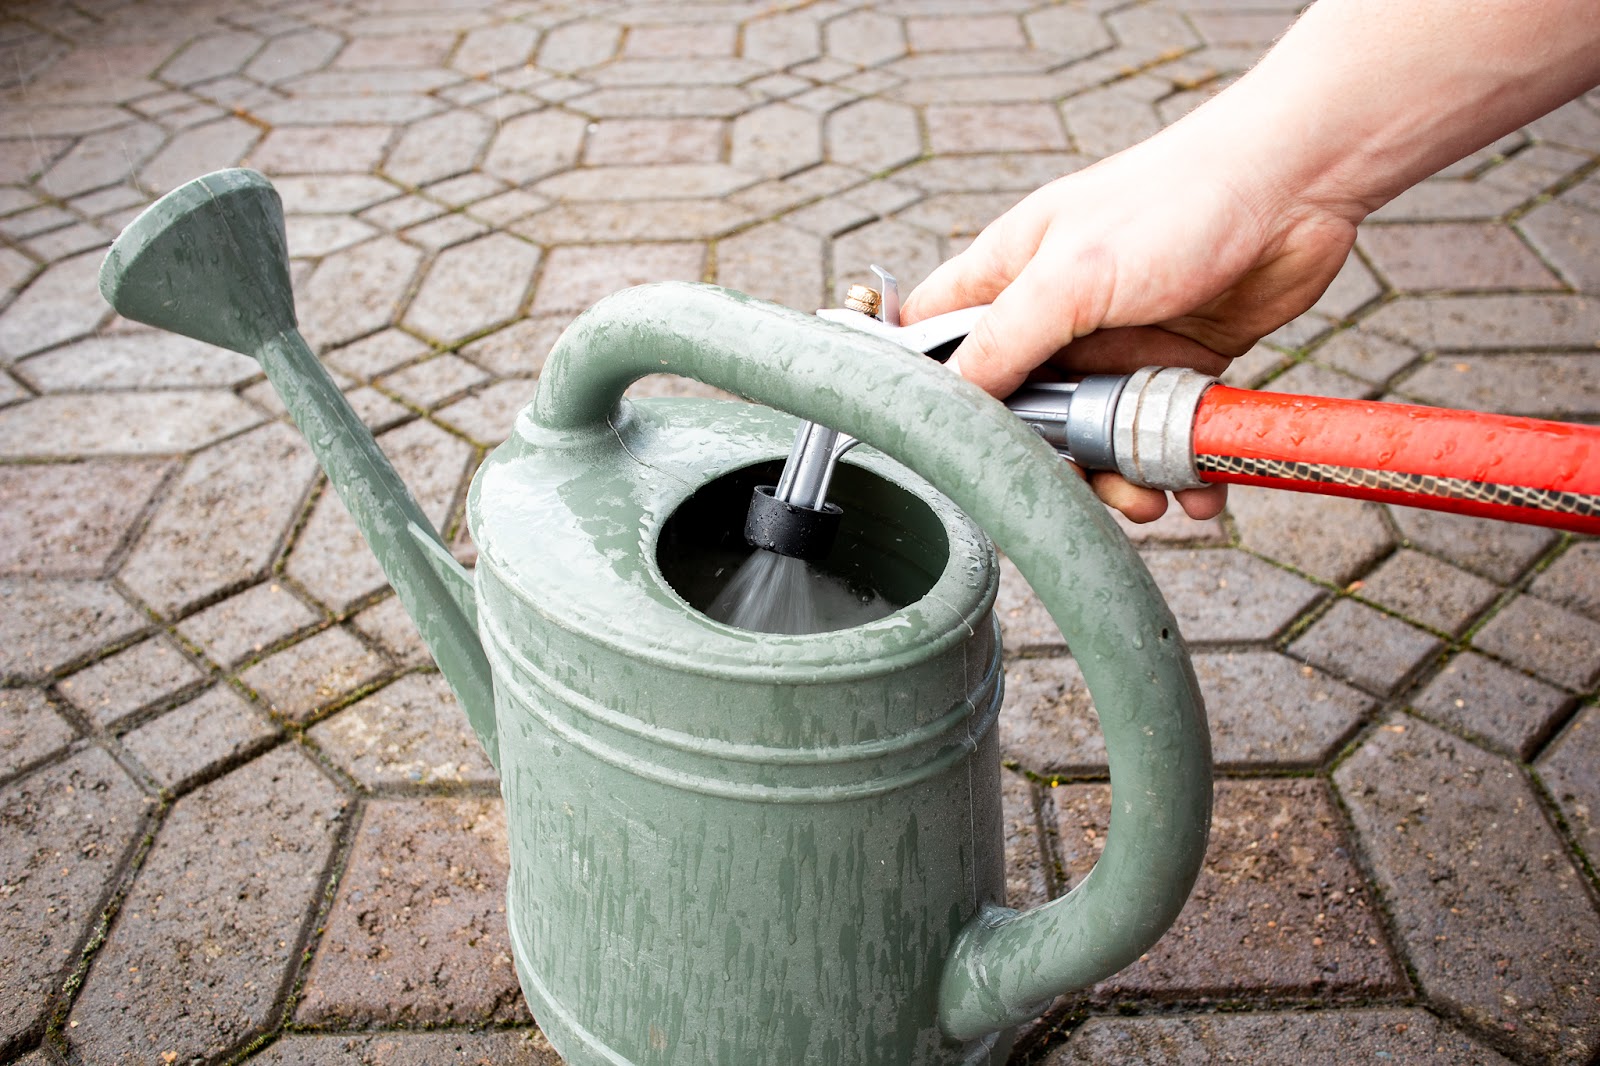
Next, sprinkle the bleach solution on your hardscape. It rained while we were applying the bleach rinse to our retaining wall so it’s difficult to see exactly how liberal Colin’s applying it—but we recommend covering the affected area by applying as much bleach rinse as you’re comfortable with.
Rest assured that your Western Interlock pavers are tough and this rinse is not going to discolor or disintegrate your pavers. In fact, most paving stones have a top face—which means that the stone only has coloring ⅛” deep. Western Interlock paving stones, on the other hand, have consistent color all the way through.
Last, rinse your pavers with fresh water. After 15–20 minutes, stretch out your garden hose again and rinse. After your hardscape dries, the fungi should be either dead or gone. If you’re dealing with moss, you’ll need to scrape or spray it off. If you’re dealing with another fungus, like algae, it should rinse easily. If not, follow our recommendations for pressure washing below.
Acid wash
- Difficulty: 1
- Cost: 2
- Est. time: 1–2 hours
- Tools: Muriatic Acid, watering can, hose
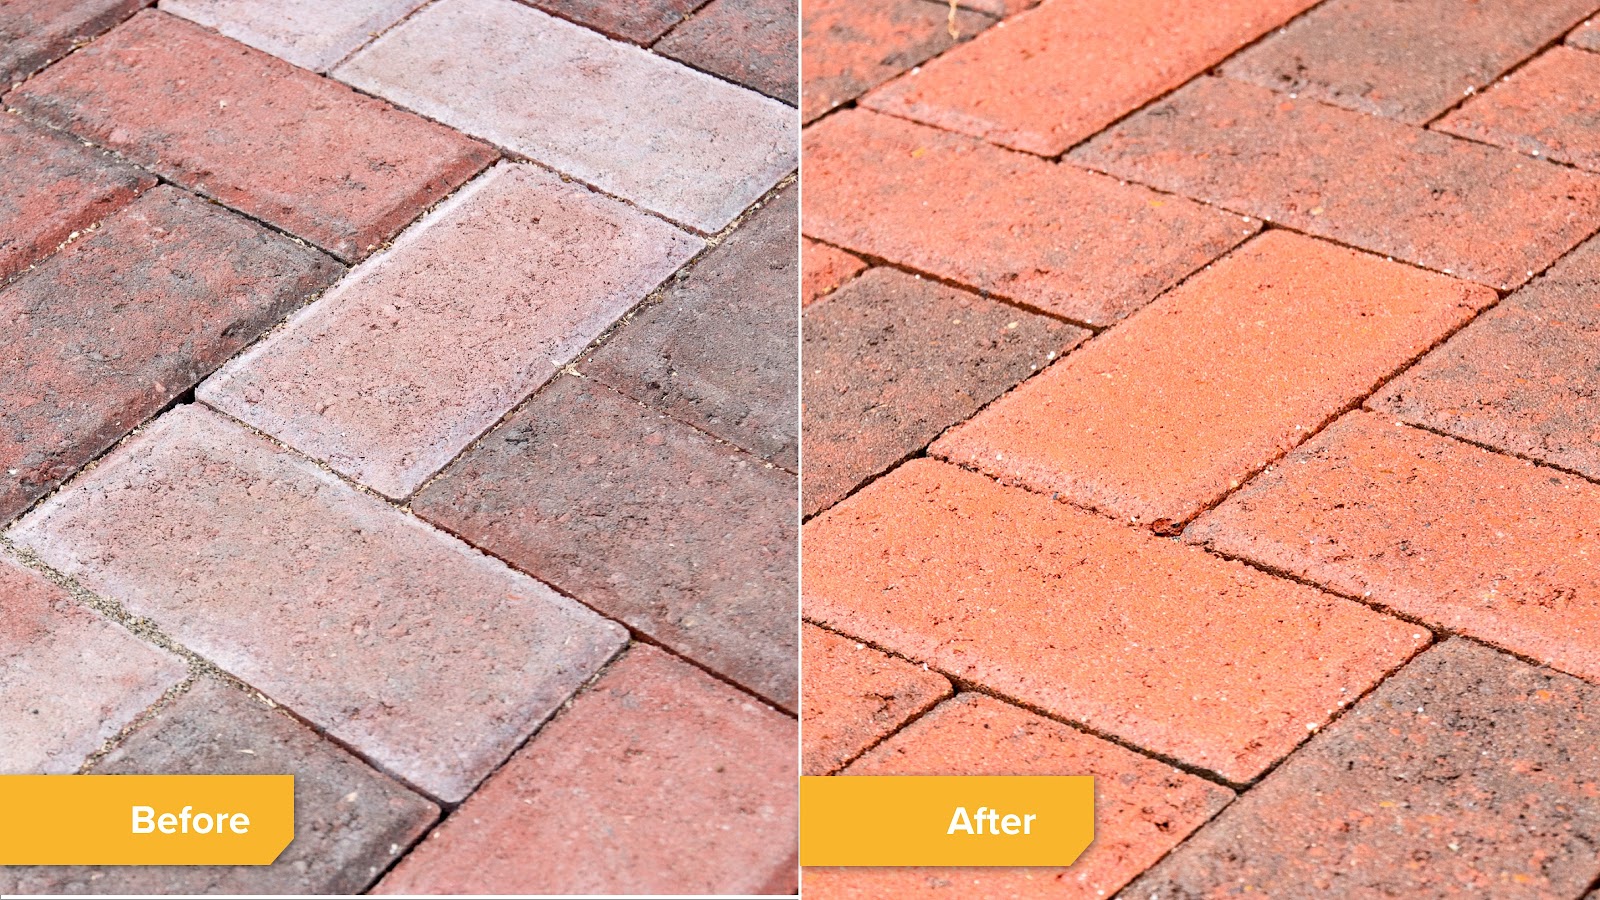
If your hardscape is starting to lose its vibrancy or you notice that it’s becoming whiter, that’s the effect of efflorescence. That’s just a big word for salt crystallization on your stones. Efflorescence is a natural occurrence and is easy to remove. All we’ll do is use a natural acid to remove a natural base. Here’s the gist of it.
First, find yourself some Muriatic Acid. We use and recommend Muriatic Acid from Transchem. The proper mixture is approximately 11:1, which works out to 20 oz of acid in a 2-gallon watering can.

Next, wash your hardscape with the Muriatic Acid mixture. Don’t be shy. Make sure to coat your hardscape well but rinse within three minutes.
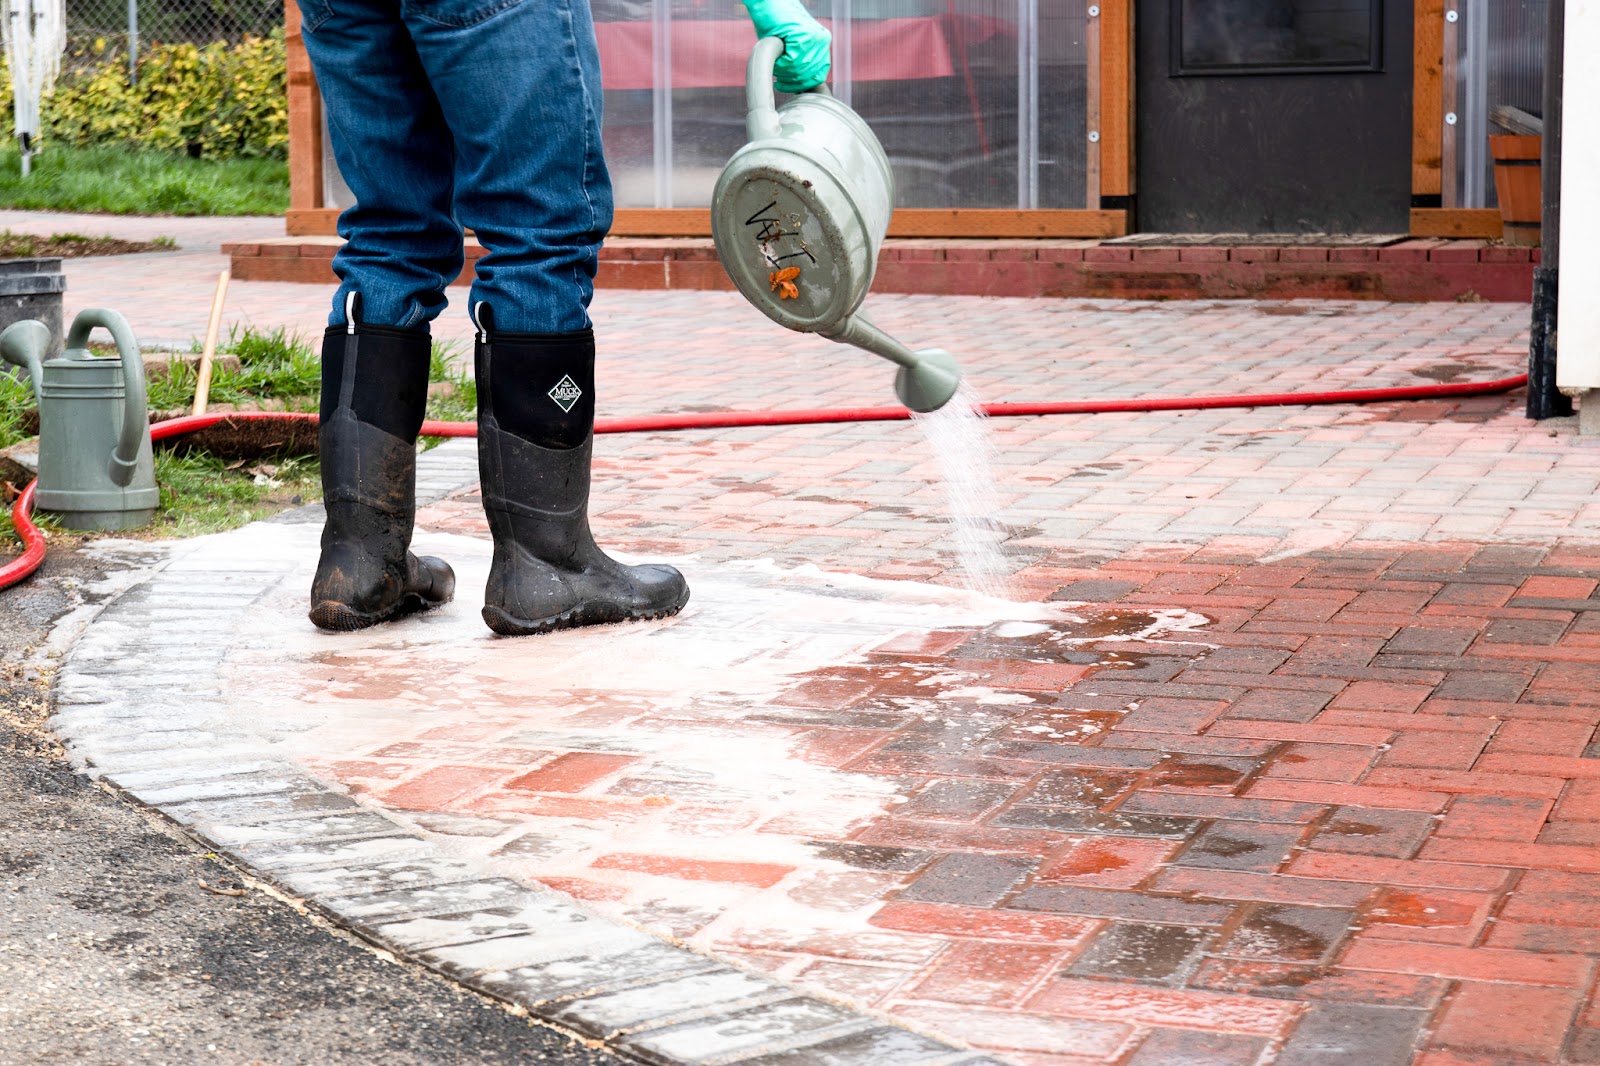
Finally, thoroughly wash off the mixture using a standard garden hose. That’s it! Your hardscape will look beautifully vibrant once again.
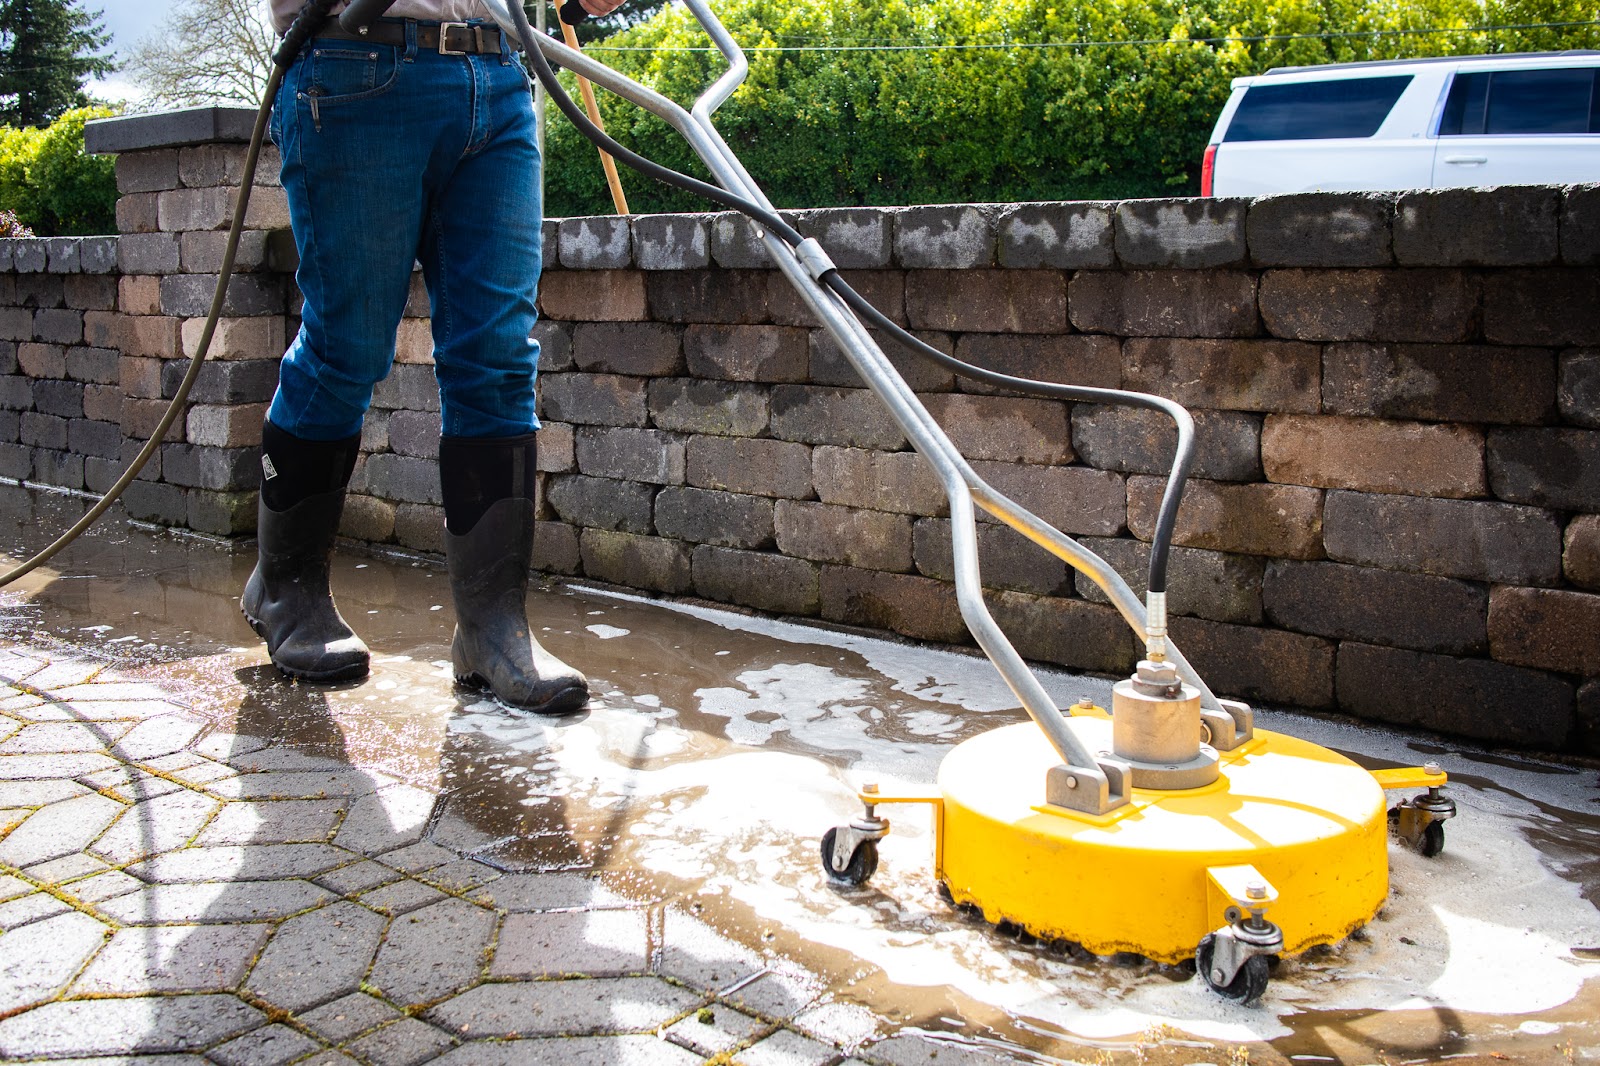
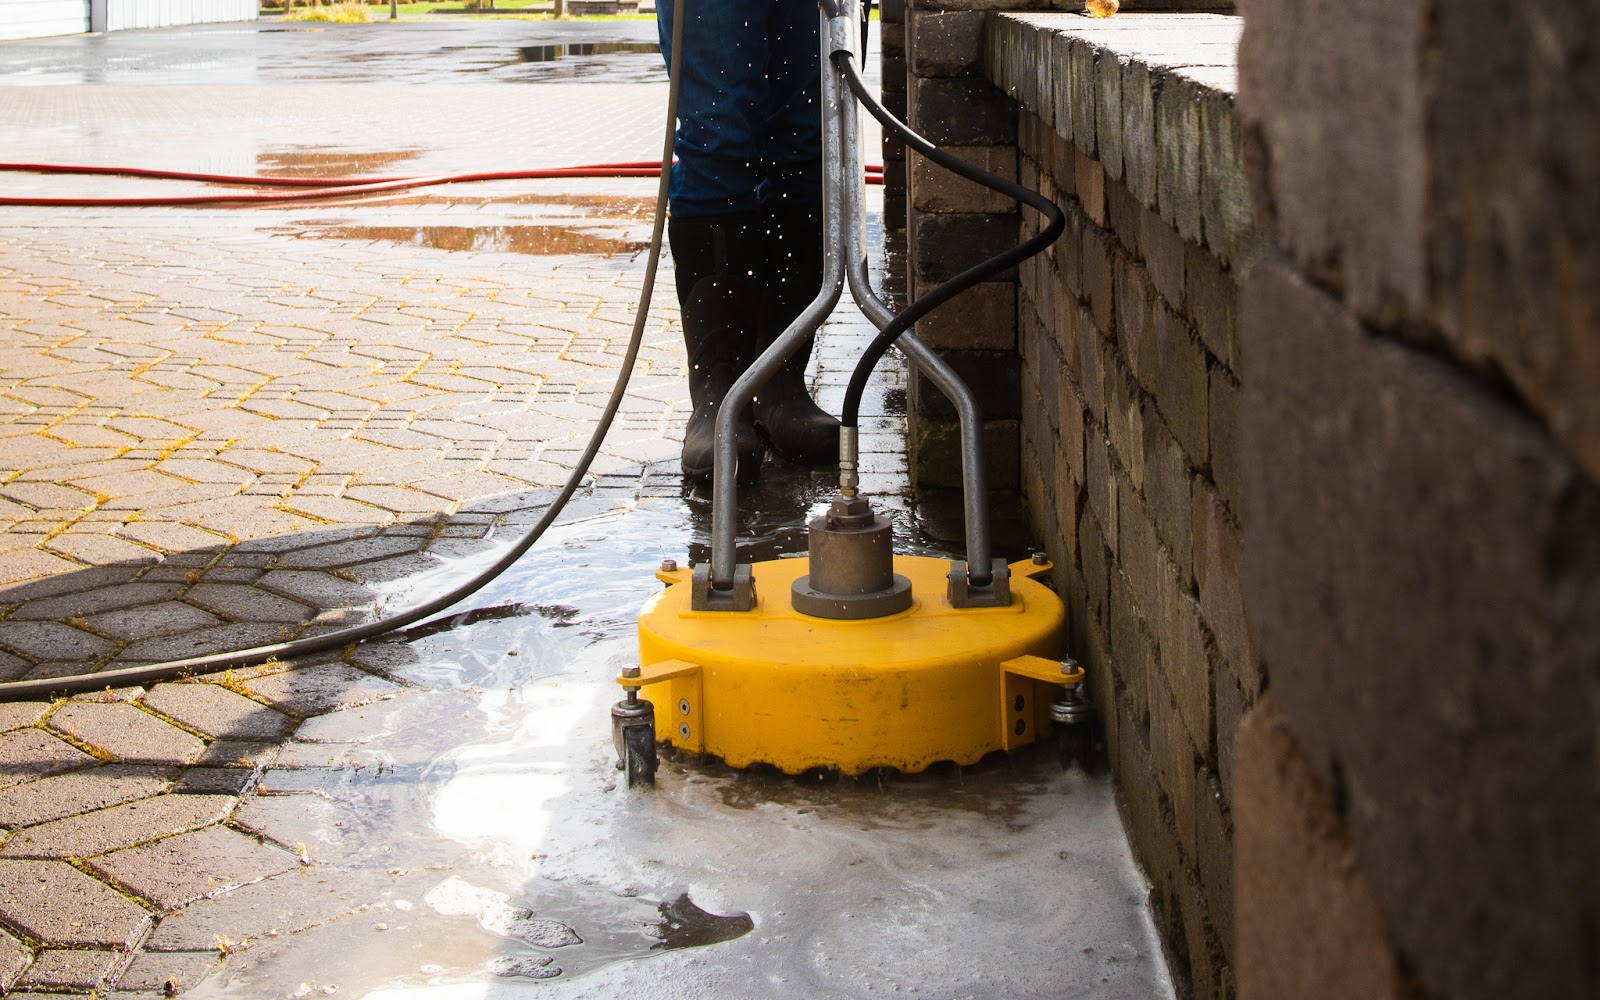
Large surface cleaning
- Difficulty: 1
- Cost: 4
- Est. time: 2–3 hours
- Tools: Pressure washer, surface cleaner
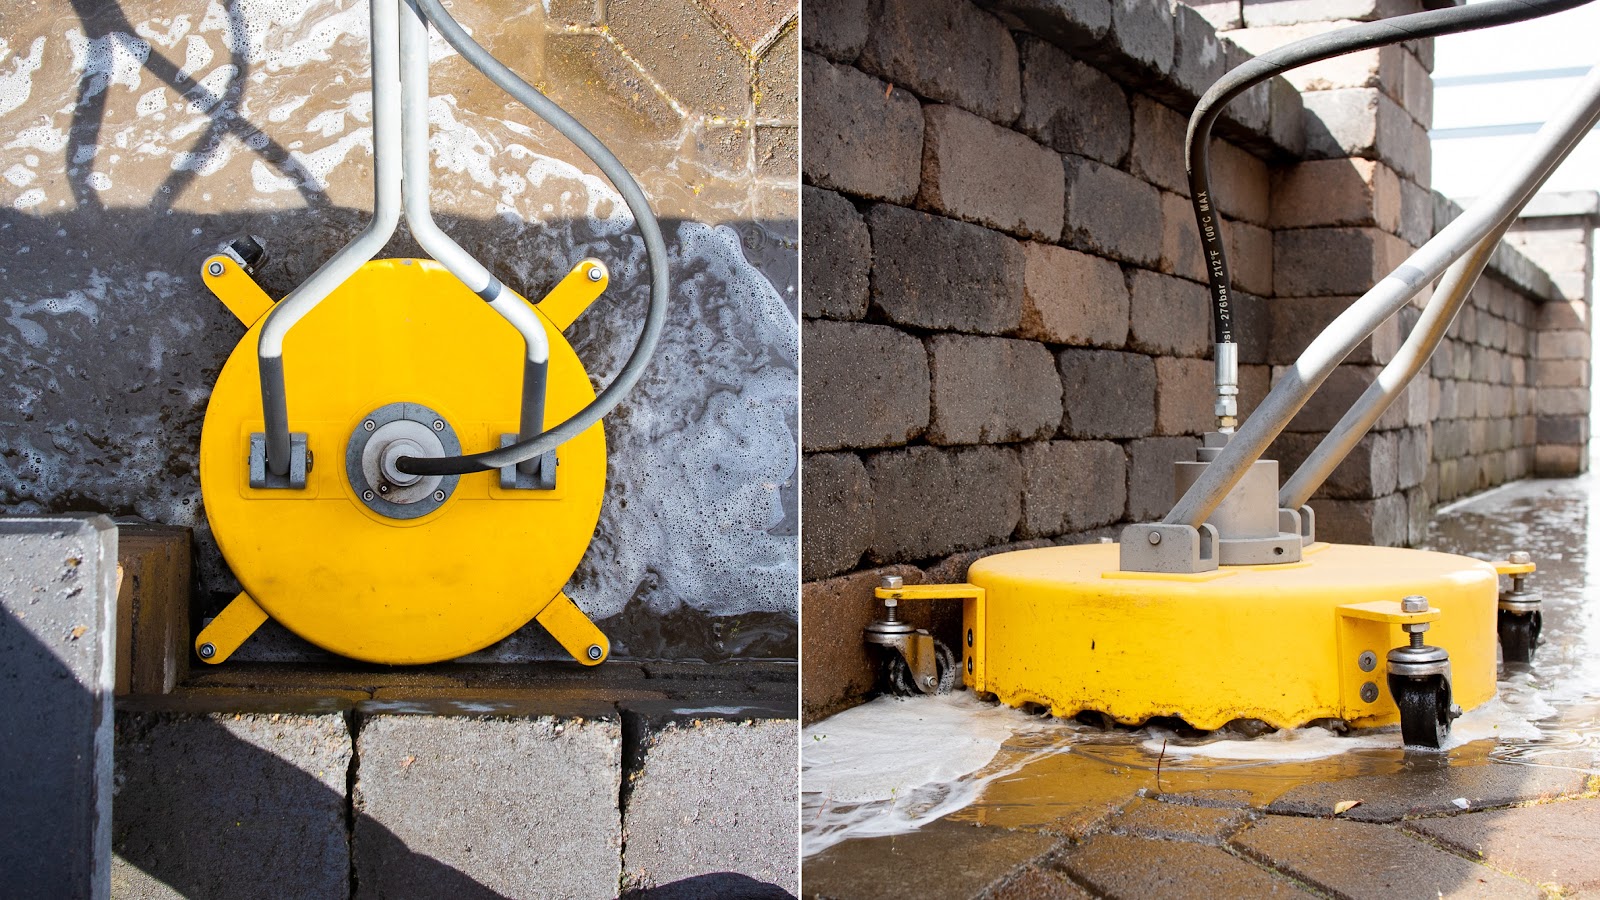
Many of our customers use paving stones to make driveways or large patios in their backyard. Some have even used our stones to make basketball or tennis courts. And let me tell you, they’re beautiful. But on the other hand, it’s a large space to clean and maintain. For these situations, we recommend using a surface cleaner.
While large surface cleaning can be done with a standard pressure washer, we’ve found that the surface cleaner attachment gives you more control and coverage because of it’s defined round cleaning space.
Using the surface cleaner is like mowing your lawn. You know exactly where you’ve mowed and you can overlap if necessary. And just like if you’re mowing tall grass, take it slow. In fact, measure your distance and try to cover about 10 feet per minute. In plain language, if you have a 10-foot walkway to clean, it should take you one minute to clean one pass.
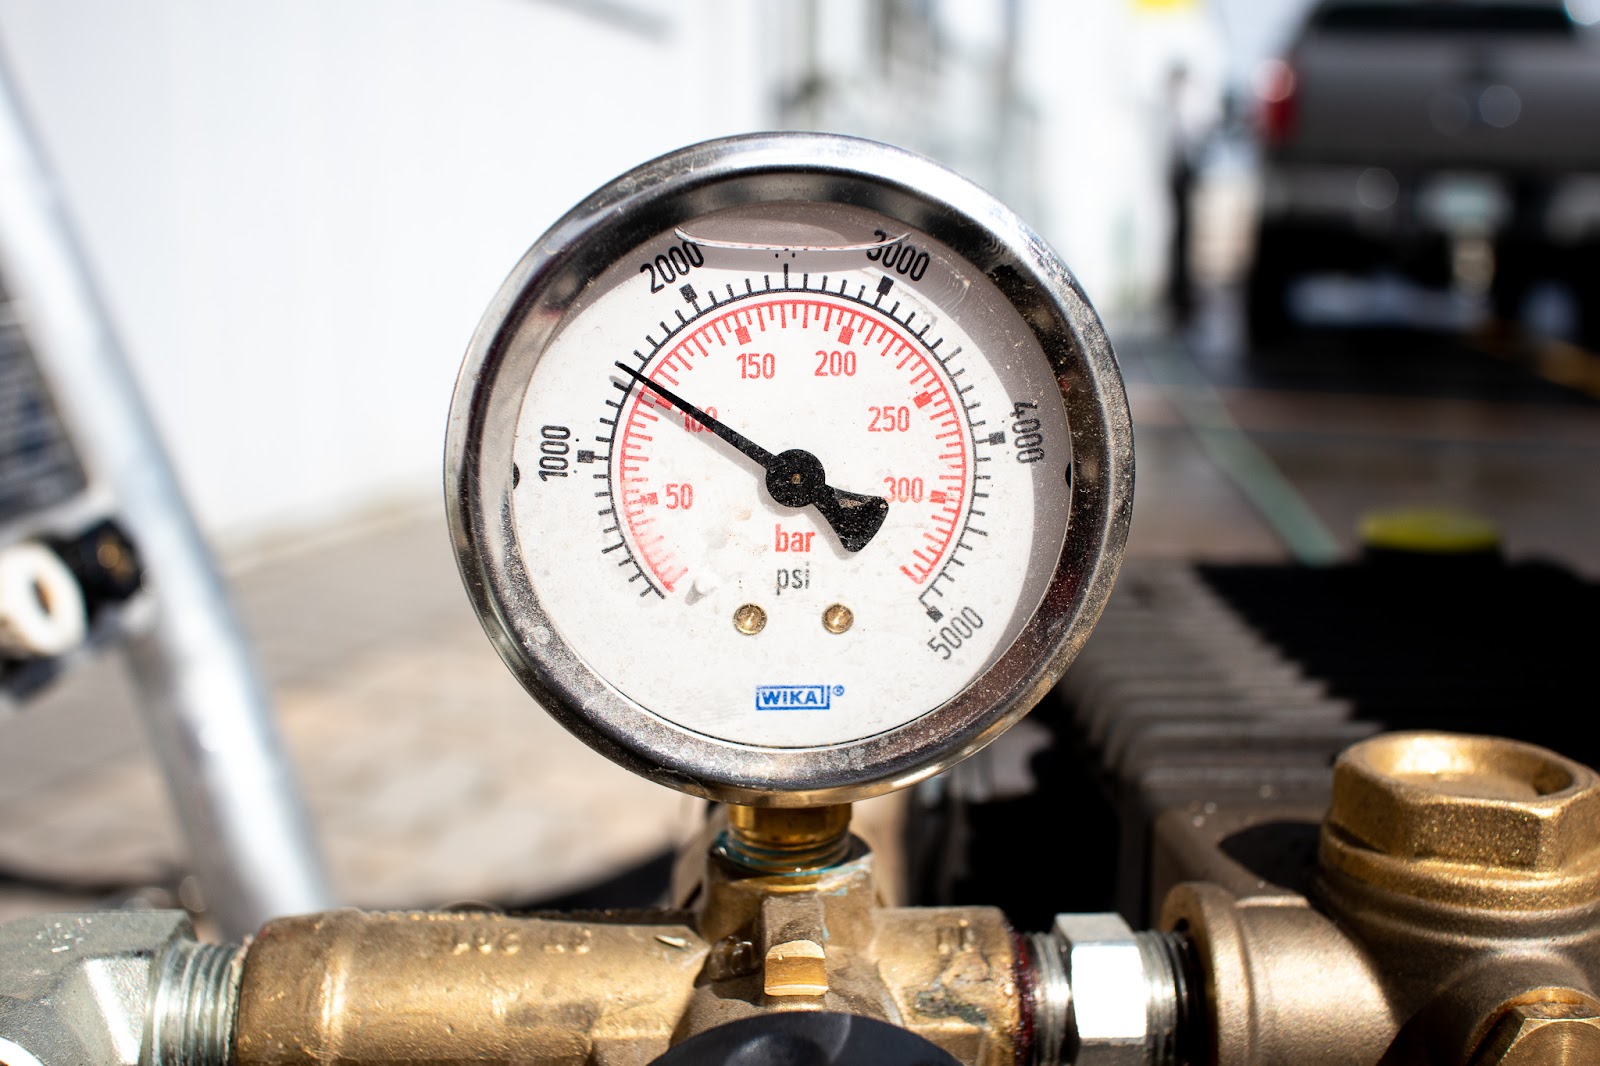
It’s important to note when doing any sort of pressure washing, that you want to control the PSI (pounds per square inch). Since the surface cleaner has two rotating heads that blast an inch or less from your hardscape, keep your pressure under 1,500 PSI.
Cleaning with a surface cleaner is easy. Like I mentioned above, just pretend you’re mowing your lawn. Walk slowly, overlap when necessary, and have yourself a good time.
Pressure washing
- Difficulty: 2
- Cost: 3
- Est. time: 2–3 hours
- Tools: Pressure washer
For everything else, there’s pressure washing. Sometimes spot cleaning, bleach rinse, or large surface cleaning just don’t cut it. Any tenacious residue that’s still hanging on can be blasted away using a pressure washer.
But while everyone loves a good pressure washing, we recommend using caution. Your hardscape relies on two things to stay beautiful: sand and sealant. And when blasting away with a pressure washer, it can be easy to remove those elements from the equation.
The sand between your pavers reinforces the structure so that it’s safe and secure to walk on, sit on, or drive on. Additionally, your Western Interlock pavers are finished with a protective sealant. This sealant doesn’t hold the pavers together, but it does make them resilient in even the harshest of weather conditions. So when you pressure wash, we recommend two things.
First, limit your water pressure to 1,500 PSI. This gives you quite a bit more pressure than the surface cleaner for those super tough stains while still keeping the pressure low enough to protect your pavers from damage.
Second, keep your nozzle at least six inches away from your hardscape. We’ve found that this is the perfect distance to get all the hard-to-get slime, grime, and fuzzies.

Third, sweep in fresh joint sand. Pressure washing, in particular, will lift the joint sand from between your pavers. Losing a bit of sand may not seem like a big deal, but just like in music how the rest is just as important as the note, the sand is just as important as the stone. Your beautiful hardscape relies on the sand and to keep it structurally sound. To replace the joint sand, simply sprinkle it around the area you cleaned and use a broom to sweep it in. If there’s any leftover, simply put it back in your sandbag or sweep it away.
By following these simple guidelines, you’ll save your pavers and maintain exceptionally beautiful hardscape.
Note about the soil in Tigard
If you are working in the Tigard area, make sure to take precautionary measures to avoid walking on the pavers with muddy shoes. The soil in Tigard has high iron content and will severely stain our paving stones. Our pavers are colored with iron oxide and the iron in the soil bonds molecularly with the iron in the pavers, resulting in an extremely difficult to remove stain.
The best preventative measure is to avoid walking in the mud to begin with, but we realize that this is an unreal expectation. The first thing that you can do is to rinse off your boots, or you can put down plywood or plastic in areas that will receive traffic. You can also put down a thick layer of sand to cover the pavers. Basically, what you want to do is to prevent the soil from coming into contact with the pavers if at all possible.
Gray tone colors such as Charcoal and Cambridge Blend are especially susceptible to staining because there are no brown tones to hide the soil.
Stones already stained? Here’s what to do
- Locate a heated pressure washer capable of exceeding 212° F. To prevent damage to the surface of the paver, it is important that the pressure can be lowered to 1500-2000 psi.
- To keep from damaging the stones, hold the wand at a safe distance of at least 8 inches away from the paver surface.
- Work in a back and forth or side to side motion and make sure you are spraying the entire stone from edge to edge or you will see the unclean areas!
- When you finish washing the area, wait to check the cleanliness of the stones after they dry. If you missed any spots, you can wash them again.
- NOTE: It may work better if you wash the stones with a good cleaner (such as SEK’s SRB) to help break down the dirt before you pressure wash them.
Have questions about cleaning and maintenance? Give us a call at 800-627-3153 or send us a message. We’d love to hear from you.
Learn from the pros for free
Here at Western Interlock, we’re on a mission to take the hard out of hardscaping. That’s why we host a live DIY seminar every month at one of our manufacturing or distribution facilities.
You see, we created DIY with Western Interlock for everyday homeowners like you and me. In each seminar, we’ll personally walk you step-by-step how to build and maintain your own hardscape. Join our next seminar for free.
Get our FREE Project Planning Guide
Tell us where to send it and we’ll email the backyard planning guide to you right away!
"*" indicates required fields


