

Get our FREE Project Planning Guide
"*" indicates required fields
The famed American basketball coach, John Wooden, once said, “If you don’t have time to do it right, when will you have time to do it over?” The truth is, most people jump into paver installation without knowing what they’re getting into—leading to common paver installation mistakes that can cost a lot of time and money down the road. We wrote this article to help save you the headaches most people encounter while installing hardscape.

At Western Interlock, we aim to help you take the hard out of hardscaping. That’s why we’ve put together a series of paver installation video tutorials on almost every aspect of DIY hardscaping—from How to Build a Circle Patio to How to Build a Retaining Wall and so much more.
Before you kick off your first (or next) hardscape project, please take a look at our list below and make sure you avoid any of these all-too-common mistakes.
1. Backfilling with dirt
If you use dirt as your backfill or base, your pavers will sink, rotate, and separate. Instead of having a smooth surface, you’ll have a bumpy, uneven surface.
Here’s why: dirt shrinks by 30% when compacted. That means, if you backfill with dirt, your hardscape will settle 30%. This becomes an issue because, if you backfill with 10″ of dirt, your pavers will settle around 3″ over time. However, if you properly lay a gravel base, you’ll essentially eliminate settling.

The principle to remember is this: your pavers are only as stable as the base they’re sitting on. That’s why you’ll need to lay a substantial gravel base on top of your dirt.
Use road base gravel so that you get the right mix of fine and coarse aggregates for the best compaction. After you lay gravel, you’ll need to spread a smooth layer of concrete sand for your pavers to settle in and stay. If you try to replace either of these aggregates with dirt, it won’t be long before you have to tear it all up and start from scratch.
2. Laying a shallow base
The second most common mistake is not digging a deep enough area for the base. When you read our recommendations for laying a base, you may think to yourself, “That’s a lot of digging!” The truth is, yes, it certainly is. However, gravel is cheap insurance to protect and preserve your pavers.

We recommend that you excavate enough dirt to lay a proper gravel base; 4” for common foot traffic areas and 6–10″ for driveways and residential parking lots. The general rule is to add an extra 2–4″ to your gravel base if you live in colder climates with continually wet or weak soils.
3. Not compacting the base
Before laying bedding sand or pavers, your gravel base needs to be flat and firm, without any bellies or rises of more than 1/8″. You accomplish this kind of precision by properly compacting your base and your pavers. If you fail to compact, you’ll experience sunken or raised pavers. In other words, a bumpy, uneven base will produce bumpy, uneven pavers.
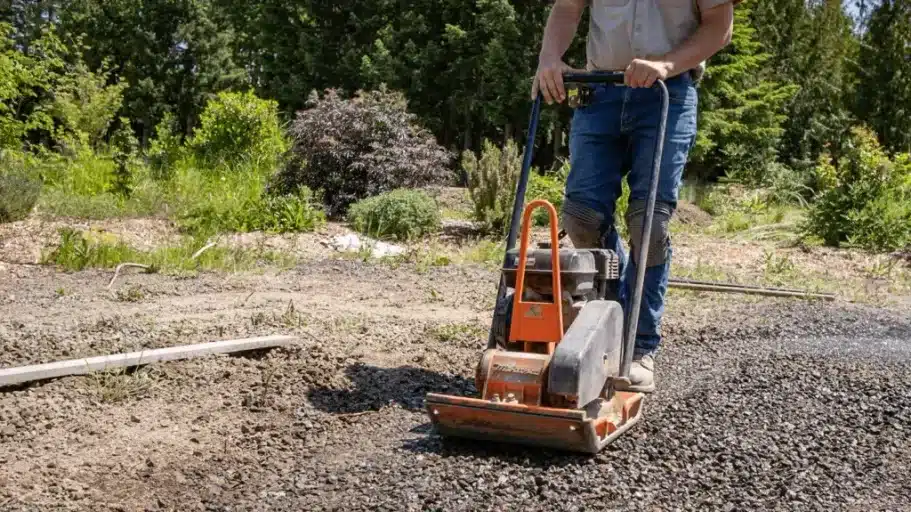
The best practice is to compact your gravel base, in both directions, with a steel tamper or a plate compactor 2″ at a time until you’ve achieved the right thickness. You’ll want to use a steel tamper for small projects and a gas plate compactor for more extensive patios, driveways, and walkways.
A general rule of thumb is that a steel plate compactor can compact about as many inches of gravel as it takes people to pick it up. The smaller compactors that most people can readily obtain, like the one shown above, require two people to pick it up, therefore it should not be used to compact more than 2″ at a time.
4. Improperly installing the bedding sand
Your bedding sand is a crucial aspect of your entire hardscape. Bedding sand helps your stones settle firmly into the base and stay-in-place; it also serves as a leveling layer to even out any minor discrepancies in the gravel base and the manufactured product. However, if you install the bedding sand improperly, you’ll leave dips or voids that show in the final product.

To properly install bedding sand, you apply a process called screeding where you lay and level your bedding sand. When screeding, you’ll want to first lay a few 1” outside diameter screed bars down on your compacted base, make sure they’re level and then bring in your sand.
Pro Tip: It’s very important that you lay no more than 1” of bedding sand. Any more will promote settling or wobbling—two things you don’t want pavers to do.

Once your sand is in place, you’ll use a 10’–12’ strike board to “screed” the sand.
5. Not using the click-and-drop method
You might be wondering if you can throw your paving stones on your base or if there’s a particular way you need to place them. There is a correct way to place a paver. However, it’s as easy as click-and-drop. Learn more about this method in our tutorial, How to Place a Paver.

If you don’t follow the click-and-drop process, you’ll make two mistakes. First, you’ll bulldoze the sand beneath your paver and create a deep void or a large hill. This error results in either sunken or raised pavers that have to be replaced later.

Second, when bulldozing, you could fill the gaps between pavers with bedding sand. Those gaps are made with spacer bars, so they stay open until you sweep in the sand to stabilize your joints.
6. Laying long linear lines of pavers
Last but not least, a critical mistake is to lay a paver pattern with a long linear line. Initially, a line like you see below seems just fine. However, all paving stone patterns accomplish two goals: beauty and stability. If you sacrifice stability for beauty, your hardscape will be structurally unstable and will shift and warp over time, causing visual imperfections and safety hazards.

The best way to avoid long linear lines is to lay one of the eight common paver patterns we cover in How to Lay a Paver Pattern. Or, you could lay a completely random layout by following these two simple guidelines:
- Never have four corners meet
- Never have any joint running linearly for more than about nine feet.
Either way, don’t make the mistake of installing unstable pavers without any pattern or guidelines. You’ll have a headache later.
Common Paver Installation Mistakes: Conclusion
We understand that no matter how beautiful hardscape is to look at, it’s intimidating to install. That’s why we publish DIY tips, tricks, and step-by-step tutorials at DIYwithWI.com and host a live DIY seminar every month during the summer at one of our manufacturing or distribution facilities.
If you have any questions, please visit our Paving Stone Display at our Manufacturing Facility in Rickreall, OR. Or, give our team of hardscape experts a call at 503-623-9084.
Get our FREE Project Planning Guide
Tell us where to send it and we’ll email the backyard planning guide to you right away!
"*" indicates required fields


